Sharp LC20B6US LC-20B6U-S Operation Manual - Page 12
Part Names of Main Unit
 |
UPC - 074000362291
View all Sharp LC20B6US manuals
Add to My Manuals
Save this manual to your list of manuals |
Page 12 highlights
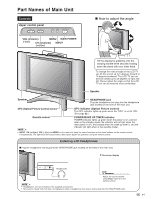
Part Names of Main Unit Controls Upper control panel VOL (Volume) MENU MAIN POWER (-)/(+) CH (Channel) INPUT ( )/( ) How to adjust the angle Tilt the display by grabbing onto the carrying handle while securely holding down the stand with your other hand. To change the vertical angle of the LCD TV set, tilt the screen up to 5 degrees forward or 10 degrees backward. The LCD TV set can also be rotated up to 25 degrees to right and left. Please adjust the angle so that the LCD TV set can be watched most comfortably. Speaker Speaker HEADPHONE jack Plug the headphone mini-plug into the Headphone jack located on the front of the main unit. OPC (Optical Picture Control) sensor OPC indicator (Optical Picture Control) The OPC indicator lights up green when the "OPC" is set to "ON". (See page 22.) Remote sensor POWER/WAKE UP TIMER indicator POWER indicator lights up green when the power is on, and red when in the standby mode (the indicator will not light when the main power is off), and orange when the wake-up timer is set (the indicator will light when in the standby mode). A • INPUT, CH ( )/( ), VOL (-)/(+) and MENU on the main unit have the same functions as the same buttons on the remote control. Fundamentally, this operation manual provides a description based on operation using the remote control. Listening with Headphones ■ Plug the headphone mini-plug into the HEADPHONE jack located on the front of the main unit. ▼ On-screen display Headphones VOLUME 20 Adjust the sound volume using VOL on the remote control. A • Headphones are not included in the supplied accessories. • No sound is heard from the main unit speakers when a headphone mini-plug is connected into the HEADPHONE jack. 11
-
 1
1 -
2
-
3
-
4
-
5
-
6
-
 7
7 -
 8
8 -
 9
9 -
 10
10 -
 11
11 -
 12
12 -
 13
13 -
 14
14 -
 15
15 -
 16
16 -
 17
17 -
18
-
19
-
20
-
21
-
22
-
23
-
24
-
25
-
26
-
27
-
28
-
29
-
30
-
31
-
32
-
33
-
34
-
35
-
36
-
37
-
38
-
39
-
40
-
41
-
42
-
43
-
44
-
45
-
46
-
47
-
48
-
49
-
50
-
51
-
52
-
53
 |
 |
