Sharp LC20B6US LC-20B6U-S Operation Manual - Page 42
Connecting a PC Continued
 |
UPC - 074000362291
View all Sharp LC20B6US manuals
Add to My Manuals
Save this manual to your list of manuals |
Page 42 highlights
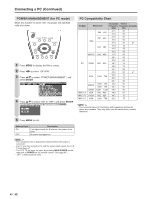
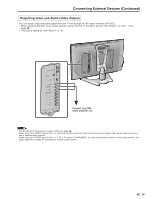
Connecting a PC (Continued) INPUT SIGNAL (for PC mode) Select the computer input signal before displaying the PC image on the LCD TV screen. A • Make sure to select the input signal to "1024 × 768" or "640 × 480", before connecting a PC. FINE SYNC. Adjustments (for PC mode) You can adjust the PC image using the FINE SYNC. menu. 1 Press MENU to display the Menu screen. 2 Press \/| to select "SETUP". 3 Press '/" to select "PC SETTING", and press ENTER. M E N U [ SETUP... P C S E T T I N G ] PICTURE AUDIO SETUP OPTION CH-SETTING + MTS CLOCK COMP.2/AV1 SELECT AV2 IN/OUT V-CHIP BLOCK CLOSED CAPTION COLOR SYSTEM PC SETTING LANGUAGE 4 Press '/" to select "INPUT SIGNAL", and press ENTER. M E N U [ SETUP... P C S E T T I N G ] INPUT SIGNAL INPUT SIGNAL FINE SYNC. 5 Press '/" to select the desired input signal and press ENTER. MENU [ INPUT SELECT SETUP... P C S E T T I N G ] SIGNAL OPTION 1 0 24x768 64 0 x48 0 6 Press MENU to exit. 1 Perform steps 1 to 3 in INPUT SIGNAL (for PC mode) to display the PC SETTING screen. 2 Press '/" to select "FINE SYNC.", and press ENTER. M E N U [ SETUP... P C S E T T I N G ] FINE SYNC. INPUT SIGNAL FINE SYNC. 3 Press '/" to select the specific adjustment item. M E N U [ SETUP... P C S E T T I N G ] FINE SYNC. H.POS.[ V.POS.[ CLOCK [ PHASE [ RESET 0 ]- 0 ]- 0 ]- 0 ]- + + + ++ 4 Press \/| to adjust the item to your desired position. 5 Press MENU to exit. Selected item H.POS. V.POS. CLOCK PHASE Description Centers the image by moving it to the left or right. Centers the image by moving it up or down. Adjusts the clock frequency. Adjusts the clock phase. A • When resetting all adjustment items to factory preset values, perform the following procedures. 1 Press '/" to select "RESET", and press ENTER. 2 Press '/" to select "YES" and press ENTER. 41
-
 1
1 -
2
-
3
-
4
-
5
-
6
-
7
-
8
-
9
-
10
-
11
-
12
-
13
-
14
-
15
-
16
-
17
-
18
-
19
-
20
-
21
-
22
-
23
-
24
-
25
-
26
-
27
-
28
-
29
-
30
-
31
-
32
-
33
-
34
-
35
-
36
-
 37
37 -
 38
38 -
 39
39 -
 40
40 -
 41
41 -
 42
42 -
 43
43 -
 44
44 -
 45
45 -
 46
46 -
 47
47 -
48
-
49
-
50
-
51
-
52
-
53
 |
 |
