Sharp MX-M310 MX-PB12 Printer Expansion Kit for the MX-M260 MX-M310 - Page 27
Con the image of the, machine., Click the [OK] button in the, printer properties window.
 |
View all Sharp MX-M310 manuals
Add to My Manuals
Save this manual to your list of manuals |
Page 27 highlights
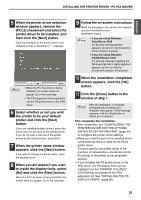
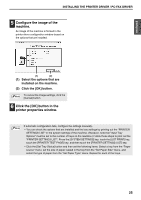
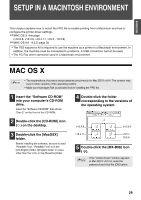
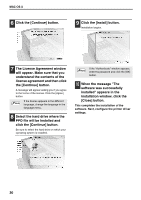
ENGLISH INSTALLING THE PRINTER DRIVER / PC-FAX DRIVER 5 Configure the image of the machine. An image of the machine is formed in the printer driver configuration window based on the options that are installed. (1) (2) (1) Select the options that are installed on the machine. (2) Click the [OK] button. Note To cancel the image settings, click the [Cancel] button. 6 Click the [OK] button in the printer properties window. If automatic configuration fails, configure the settings manually. Note • You can check the options that are installed and the tray settings by printing out the "PRINTER SETTINGS LIST" in the system settings of the machine. (However, note that "Input Tray Options" must be set to the number of trays on the machine.) Follow these steps to print out the "PRINTER SETTINGS LIST": Press the [SYSTEM SETTINGS] key, touch the [LIST PRINT] key, touch the [PRINTER TEST PAGE] key, and then touch the [PRINTER SETTINGS LIST] key. • Click the [Set Tray Status] button and then set the following items. Select a tray from the "Paper source" menu, set the size of paper loaded in the tray from the "Set Paper Size" menu, and select the type of paper from the "Set Paper Type" menu. Repeat for each of the trays. 25
-
 1
1 -
2
-
3
-
4
-
5
-
6
-
7
-
8
-
9
-
10
-
11
-
12
-
13
-
14
-
15
-
16
-
17
-
18
-
19
-
20
-
21
-
 22
22 -
 23
23 -
 24
24 -
 25
25 -
 26
26 -
 27
27 -
 28
28 -
 29
29 -
 30
30 -
 31
31 -
 32
32 -
33
-
34
-
35
-
36
-
37
-
38
-
39
-
40
-
41
-
42
-
43
-
44
-
45
-
46
-
47
-
48
-
49
-
50
-
51
-
52
-
53
-
54
-
55
-
56
-
57
-
58
-
59
-
60
-
61
-
62
-
63
-
64
-
65
-
66
-
67
-
68
-
69
-
70
-
71
-
72
-
73
-
74
-
75
-
76
-
77
-
78
-
79
-
80
-
81
-
82
-
83
-
84
-
85
-
86
-
87
-
88
-
89
-
90
-
91
-
92
-
93
-
94
-
95
-
96
-
97
-
98
-
99
-
100
-
101
-
102
-
103
-
104
-
105
-
106
-
107
-
108
-
109
-
110
-
111
-
112
-
113
-
114
-
115
-
116
-
117
-
118
-
119
-
120
-
121
-
122
-
123
-
124
-
125
-
126
-
127
-
128
-
129
-
130
-
131
-
132
-
133
-
134
-
135
-
136
-
137
-
138
-
139
-
140
-
141
-
142
-
143
-
144
-
145
-
146
-
147
-
148
-
149
-
150
-
151
-
152
-
153
-
154
-
155
-
156
-
157
-
158
-
159
-
160
-
161
-
162
-
163
-
164
-
165
-
166
-
167
-
168
-
169
-
170
-
171
-
172
 |
 |
