Sharp PN-L702B PN-L702B Pen Software v2.2 Operation Manual - Page 12
Erasing a drawn line, Changing the eraser size - pen software
 |
View all Sharp PN-L702B manuals
Add to My Manuals
Save this manual to your list of manuals |
Page 12 highlights
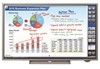
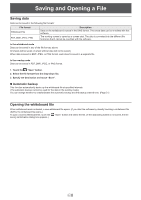
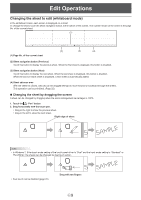
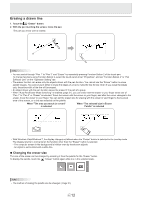
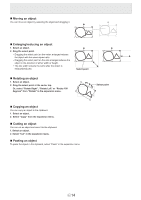
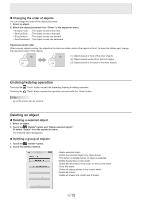
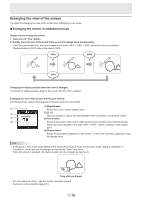
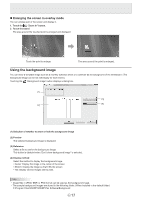
Erasing a drawn line 1. Touch the "Eraser" button. 2. With the pen touching the screen, move the pen. The part you move over is erased. TIPS • You can switch through "Pen 1" to "Pen 3" and "Eraser" by repeatedly pressing Function Button 2 of the touch pen. To change functions using Function Button 2, select the touch panel driver "Properties", and set "Function Button 2" to "Pen Software Link" on the "Operation Setting" tab. • The eraser function can erase only the objects drawn with the pen function. You cannot use the "Eraser" button to erase pasted images. You cannot use it either to erase the edges of a line to make the line thinner. Even if you erase the edges only, the entire width of the line will be erased. • An object drawn with the pen function cannot be erased if it is part of a group. • When "Auto Pen/Eraser Mode Switching" is enabled (page 21), you can erase with the eraser or your finger when one of "Pen 1" to "Pen 3" or "Eraser" is selected. Touch the screen with the eraser or your finger, and after the cursor changes to the eraser, move the eraser or your finger. You can set the eraser size for erasing with the eraser or your finger to the touched area of the screen, or to the size selected on the palette. When "The area you touch (or cover)" is selected When "The selected size in Eraser Palette" is selected • With Windows Vista/Windows 7, the display changes as follows when the "Eraser" button is selected in the overlay mode. The display returns to normal when the function other than the "Eraser" button is selected. - The computer screen in the background is hidden even by translucent objects. - An object is surrounded with a white line. n Changing the eraser size The size of the eraser can be changed by selecting it from the palette for the "Eraser" button. To display the palette, touch the "Eraser" button again while it is in the selected state. TIPS • The method of closing the palette can be changed. (Page 21) E 12
-
 1
1 -
2
-
3
-
4
-
5
-
6
-
 7
7 -
 8
8 -
 9
9 -
 10
10 -
 11
11 -
 12
12 -
 13
13 -
 14
14 -
 15
15 -
 16
16 -
 17
17 -
18
-
19
-
20
-
21
-
22
-
23
-
24
-
25
 |
 |