Sharp UX B20 UX-B20 Operation Manual - Page 77
right end first.
 |
UPC - 074000033917
View all Sharp UX B20 manuals
Add to My Manuals
Save this manual to your list of manuals |
Page 77 highlights
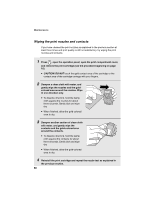
Maintenance 4 Wipe the scanning glass (exposed by removing the white roller) and rollers with a clean cloth. • Make sure that all dirt and stains (such as correcting fluid) are removed. Dirt and stains will cause vertical lines on transmitted images and copies. If the scanning glass is difficult to clean If you find it difficult to remove dirt from the scanning glass, you can try moistening the cloth with isopropyl alcohol or denatured alcohol. Take care that no alcohol gets on the rollers. 5 Replace the white roller, inserting the right end first. 1 2 6 Push the green lever up and back. Make sure that the small knob on the lever goes into the hole on the side of the compartment. 75 7. Maintenance
-
 1
1 -
2
-
3
-
4
-
5
-
6
-
7
-
8
-
9
-
10
-
11
-
12
-
13
-
14
-
15
-
16
-
17
-
18
-
19
-
20
-
21
-
22
-
23
-
24
-
25
-
26
-
27
-
28
-
29
-
30
-
31
-
32
-
33
-
34
-
35
-
36
-
37
-
38
-
39
-
40
-
41
-
42
-
43
-
44
-
45
-
46
-
47
-
48
-
49
-
50
-
51
-
52
-
53
-
54
-
55
-
56
-
57
-
58
-
59
-
60
-
61
-
62
-
63
-
64
-
65
-
66
-
67
-
68
-
69
-
70
-
71
-
 72
72 -
 73
73 -
 74
74 -
 75
75 -
 76
76 -
 77
77 -
 78
78 -
 79
79 -
 80
80 -
 81
81 -
 82
82 -
83
-
84
-
85
-
86
-
87
-
88
-
89
-
90
-
91
-
92
-
93
-
94
-
95
-
96
-
97
-
98
-
99
-
100
-
101
-
102
-
103
-
104
 |
 |

Maintenance
75
7. Maintenance
4
Wipe the scanning glass (exposed by
removing the white roller) and rollers
with a clean cloth.
•
Make sure that all dirt and stains (such
as correcting fluid) are removed. Dirt
and stains will cause vertical lines on
transmitted images and copies.
If the scanning glass is difficult to clean
If you find it difficult to remove dirt from the scanning glass, you can try moistening
the cloth with isopropyl alcohol or denatured alcohol. Take care that no alcohol
gets on the rollers.
5
Replace the white roller, inserting the
right end first.
6
Push the green lever up and back. Make sure that the small knob on the
lever goes into the hole on the side of the compartment.
1
2