Sharp VL-NZ150U VLNZ100U|VLNZ150U Operation Manual - Page 32
Attaching the Wrist, Strap, Attaching the Lens, Using the Lens Cap
 |
View all Sharp VL-NZ150U manuals
Add to My Manuals
Save this manual to your list of manuals |
Page 32 highlights
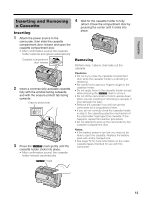
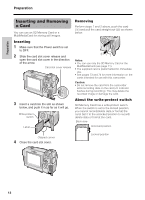
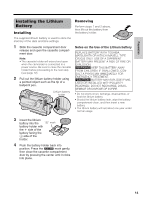
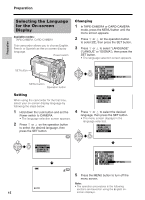
Preparation Preparation Changing to the 24-hour Time Mode 1 After performing step 8 above, press l or m to select "12H/24H", then press the SET button. Attaching the Wrist Strap Attach the wrist strap to the wrist strap loop as shown below. CLOCK SET D I SPLAY SE T T I NG 12H/ 24H 12H RE TURN 24H Wrist strap loop 2 Press l or m to select "24H", then press the SET button. 12H 24H 24H 3 Press the MENU button to turn off the menu screen. Notes: • The date and time, once set, are internally recorded even when not displayed on the screen. • The menu screen automatically turns off if no settings are made within five minutes. Caution: • Do not swing the camcorder by the strap. Using the Lens Cap Attach the strap to the lens cap as shown below. Attaching the Lens Hood When recording outdoors on a sunny day or in a location with bright lighting, attach the supplied lens hood to the camcorder. Turn the lens hood in the direction of the arrow to attach it. Attach the strap of the lens cap to the wrist strap as shown below. To remove it, turn it in the opposite direction. Notes: • The lens cap can still be attached on top of the lens hood. • Filters and other accessories cannot be attached 17 on the top of the lens hood.
-
 1
1 -
2
-
3
-
4
-
5
-
6
-
7
-
8
-
9
-
10
-
11
-
12
-
13
-
14
-
15
-
16
-
17
-
18
-
19
-
20
-
21
-
22
-
23
-
24
-
25
-
26
-
 27
27 -
 28
28 -
 29
29 -
 30
30 -
 31
31 -
 32
32 -
 33
33 -
 34
34 -
 35
35 -
 36
36 -
 37
37 -
38
-
39
-
40
-
41
-
42
-
43
-
44
-
45
-
46
-
47
-
48
-
49
-
50
-
51
-
52
-
53
-
54
-
55
-
56
-
57
-
58
-
59
-
60
-
61
-
62
-
63
-
64
-
65
-
66
-
67
-
68
-
69
-
70
-
71
-
72
-
73
-
74
-
75
-
76
-
77
-
78
-
79
-
80
-
81
-
82
-
83
-
84
-
85
-
86
-
87
-
88
-
89
-
90
-
91
-
92
-
93
-
94
-
95
-
96
-
97
-
98
-
99
-
100
-
101
-
102
-
103
-
104
-
105
-
106
-
107
-
108
-
109
-
110
-
111
-
112
 |
 |
