Sharp VL-NZ150U VLNZ100U|VLNZ150U Operation Manual - Page 92
Using a Cleaning Tape Commercially, Available, Causes of video head clogging
 |
View all Sharp VL-NZ150U manuals
Add to My Manuals
Save this manual to your list of manuals |
Page 92 highlights
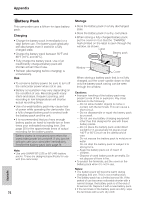
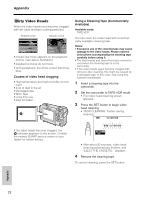
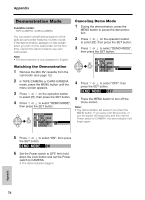
Appendix Dirty Video Heads When the video heads have become clogged with dirt (dust and tape coating particles), Striped noise Mosaic noise • mosaic-like noise appears on the playback picture. (see above illustration) • playback pictures do not move. • during playback, the whole screen becomes blue. Causes of video head clogging • High-temperature and high-humidity environment • A lot of dust in the air • Damaged tape • Worn tape • Long-time use • Dew formation Using a Cleaning Tape (Commercially Available) Available mode: TAPE-VCR You can clean the video head with a commercially available cleaning tape. Notes: • Excessive use of the cleaning tape may cause damage to the video heads. Please read the instructions accompanying the cleaning tape carefully before using it. • The fast forward and rewind functions cannot be used when the cleaning tape is in the camcorder. • If the video heads again become clogged with dirt soon after cleaning, this might be caused by a damaged tape. In this case, stop using that cassette immediately. 1 Insert a cleaning tape into the camcorder. 2 Set the camcorder to TAPE-VCR mode. • The video head cleaning screen appears. 3 Press the SET button to begin video head cleaning. • "NOW CLEANING" flashes during cleaning. CL EAN I NG If the video heads become clogged, the v indicator appears on the screen. Contact the nearest SHARP service center or your dealer for further advice. NOW C L E AN I NG START S TOP • After about 20 seconds, video head cleaning automatically finishes, and "EJECT THE CASSETTE." displays. 4 Remove the cleaning tape. To cancel cleaning, press the SET button. Appendix 77
-
 1
1 -
2
-
3
-
4
-
5
-
6
-
7
-
8
-
9
-
10
-
11
-
12
-
13
-
14
-
15
-
16
-
17
-
18
-
19
-
20
-
21
-
22
-
23
-
24
-
25
-
26
-
27
-
28
-
29
-
30
-
31
-
32
-
33
-
34
-
35
-
36
-
37
-
38
-
39
-
40
-
41
-
42
-
43
-
44
-
45
-
46
-
47
-
48
-
49
-
50
-
51
-
52
-
53
-
54
-
55
-
56
-
57
-
58
-
59
-
60
-
61
-
62
-
63
-
64
-
65
-
66
-
67
-
68
-
69
-
70
-
71
-
72
-
73
-
74
-
75
-
76
-
77
-
78
-
79
-
80
-
81
-
82
-
83
-
84
-
85
-
86
-
 87
87 -
 88
88 -
 89
89 -
 90
90 -
 91
91 -
 92
92 -
 93
93 -
 94
94 -
 95
95 -
 96
96 -
 97
97 -
98
-
99
-
100
-
101
-
102
-
103
-
104
-
105
-
106
-
107
-
108
-
109
-
110
-
111
-
112
 |
 |
