Sonos Controller for PC User Guide - Page 90
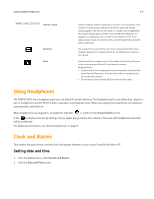
Clock and Alarms, Setting date and time, Adding an alarm
 |
View all Sonos Controller for PC manuals
Add to My Manuals
Save this manual to your list of manuals |
Page 90 highlights
5-4 Clock and Alarms User Guide This section discusses how to use the clock and alarms features on your Sonos Controller for Mac or PC. Setting date and time 1. From the Zones menu, select Clocks and Alarms. 2. Click the Date and Time button. 3. Choose one of the following options: • Select your time zone, desired time format, and date format, and then click OK. • Select the Select the date and time from the Internet radio button, and then click OK. • Select the Set the date and time manually radio button. Make your selections from the displayed fields, and then click OK. Adding an alarm 1. From the Zones menu, select Clocks and Alarms. 2. Click New. 3. Choose the desired settings for this alarm, including the alarm time, the zone you would like the alarm to play in, the music source you'd like to play from, the frequency of the alarm, and the volume and duration settings. Note: If the music you've selected is not available (such as an Internet radio station that has dropped off), your alarm will play the Sonos chime instead.To stop the chime, you can press Pause. • If you check Include linked zones, the alarm will play in the zones that are linked together at the time the alarm goes off. It does not play in the zones that were linked when the alarm was originally added to the Sonos system. • If you check Shuffle music, the play mode for the selected alarm music will be set to shuffle. Editing an alarm 1. From the Zones pane, click to highlight the zone you want to change the alarm setting for. 2. From the Zones menu, select Clocks and Alarms. 3. Select the alarm you wish to change, and click Edit. 4. Make the desired changes, and click OK. • If you check Include Linked Zones, the alarm will play in the zones that are linked together when the alarm goes off. It does not play in the zones that were linked when the alarm was originally added to the Sonos system.
-
 1
1 -
2
-
3
-
4
-
5
-
6
-
7
-
8
-
9
-
10
-
11
-
12
-
13
-
14
-
15
-
16
-
17
-
18
-
19
-
20
-
21
-
22
-
23
-
24
-
25
-
26
-
27
-
28
-
29
-
30
-
31
-
32
-
33
-
34
-
35
-
36
-
37
-
38
-
39
-
40
-
41
-
42
-
43
-
44
-
45
-
46
-
47
-
48
-
49
-
50
-
51
-
52
-
53
-
54
-
55
-
56
-
57
-
58
-
59
-
60
-
61
-
62
-
63
-
64
-
65
-
66
-
67
-
68
-
69
-
70
-
71
-
72
-
73
-
74
-
75
-
76
-
77
-
78
-
79
-
80
-
81
-
82
-
83
-
84
-
 85
85 -
 86
86 -
 87
87 -
 88
88 -
 89
89 -
 90
90 -
 91
91 -
 92
92 -
 93
93 -
 94
94 -
 95
95 -
96
-
97
-
98
-
99
-
100
-
101
-
102
-
103
-
104
-
105
-
106
-
107
-
108
-
109
-
110
-
111
-
112
-
113
-
114
-
115
-
116
-
117
-
118
-
119
-
120
-
121
 |
 |
