Sony Ericsson R520m User Guide - Page 24
Increasing Ring, Ring Signal Type, Specific Ring Signals
 |
View all Sony Ericsson R520m manuals
Add to My Manuals
Save this manual to your list of manuals |
Page 24 highlights
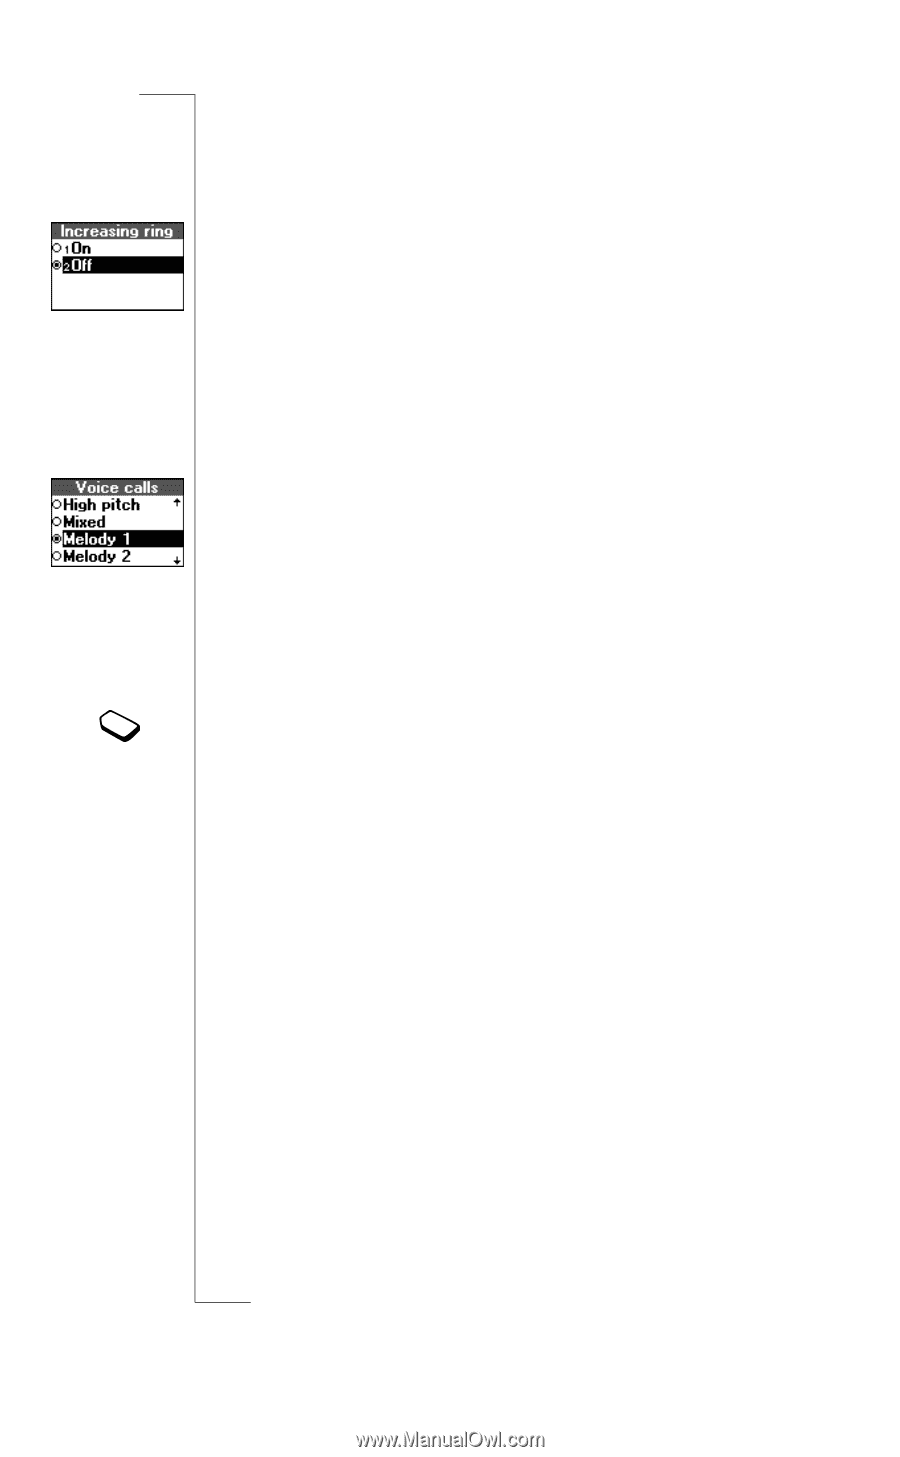
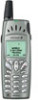
EricssonNoMtofboilreCCoommmmerucniiaclatUisoens AB Increasing Ring You can select a ring signal, Increasing ring, that rises in steps from the lowest volume to the highest. To turn the increasing ring on or off 1. Scroll to Settings, Y E S , Sounds & alerts, Y E S , Increasing ring, Y E S . 2. Select On or Off and press Y E S . The increasing ring must be Off for the ring signal volume to apply. Ring Signal Type You can select a ring signal from a list of different sounds and melodies. See also "Composing Your Own Melodies" on page 25. To select one of the existing ring signals 1. Scroll to Settings, Y E S , Sounds & alerts, Y E S, Ring signals, Y E S , Voice calls, Y E S . 2. Select the ring signal type that you want and press Y E S . Tip: Use the volume key to change the ring signal silently. The Low Pitch ring signal has been specially developed for people with hearing disabilities. Specific Ring Signals If you subscribe to the Two Line Service, you can set different ring signals for the two lines. Line 1 and Line 2 are displayed instead of Voice calls. If your SIM subscription supports Fax and Data calls, you can set different ring signals for voice, fax and data calls respectively. If your subscription includes the Calling Line Identification (CLI) service, you can assign a Personal ring signal to up to ten callers. To set a specific ring signal for a caller 1. Scroll to Settings, Y E S , Sounds & alerts, Y E S, Ring signals, Y E S , Personal rings, Y E S , Add new?, Y E S . 2. Enter the first letter of the contact name and press Y E S . 3. Select a contact and press Y E S . 4. Select a ring signal and press Y E S . To delete a caller's number 1. Scroll to Settings, Y E S , Sounds & alerts, Y E S, Ring signals, Y E S , Personal rings, Y E S . 2. Scroll to the number you wish to delete and press Y E S . 3. Select Delete and press Y E S . 24 Personalizing Your Phone
-
 1
1 -
2
-
3
-
4
-
5
-
6
-
7
-
8
-
9
-
10
-
11
-
12
-
13
-
14
-
15
-
16
-
17
-
18
-
 19
19 -
 20
20 -
 21
21 -
 22
22 -
 23
23 -
 24
24 -
 25
25 -
 26
26 -
 27
27 -
 28
28 -
 29
29 -
30
-
31
-
32
-
33
-
34
-
35
-
36
-
37
-
38
-
39
-
40
-
41
-
42
-
43
-
44
-
45
-
46
-
47
-
48
-
49
-
50
-
51
-
52
-
53
-
54
-
55
-
56
-
57
-
58
-
59
-
60
-
61
-
62
-
63
-
64
-
65
-
66
-
67
-
68
-
69
-
70
-
71
-
72
-
73
-
74
-
75
-
76
-
77
-
78
-
79
-
80
-
81
-
82
-
83
-
84
-
85
-
86
-
87
-
88
-
89
-
90
-
91
-
92
-
93
-
94
-
95
-
96
-
97
-
98
-
99
-
100
-
101
-
102
-
103
-
104
-
105
-
106
-
107
-
108
-
109
-
110
-
111
-
112
-
113
-
114
-
115
-
116
-
117
-
118
-
119
-
120
-
121
-
122
-
123
-
124
-
125
-
126
-
127
-
128
-
129
-
130
-
131
-
132
-
133
-
134
-
135
-
136
-
137
-
138
-
139
-
140
-
141
-
142
-
143
-
144
-
145
-
146
-
147
-
148
-
149
-
150
-
151
-
152
 |
 |