Sony BDV-F7 Operating Instructions - Page 17
Step 2: Connecting the System
 |
UPC - 027242787056
View all Sony BDV-F7 manuals
Add to My Manuals
Save this manual to your list of manuals |
Page 17 highlights
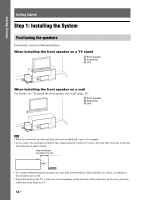
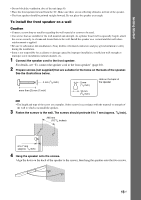
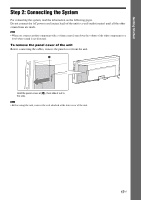
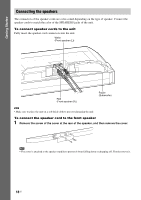
Getting Started Step 2: Connecting the System For connecting the system, read the information on the following pages. Do not connect the AC power cord (mains lead) of the unit to a wall outlet (mains) until all the other connections are made. Note • When you connect another component with a volume control, turn down the volume of the other components to a level where sound is not distorted. To remove the panel cover of the unit Before connecting the cables, remove the panel cover from the unit. A Hold the panel cover at (A), then slide it out to the side. Note • Before using the unit, remove the seal attached at the lower rear of the unit. 17US
-
 1
1 -
2
-
3
-
4
-
5
-
6
-
7
-
8
-
9
-
10
-
11
-
 12
12 -
 13
13 -
 14
14 -
 15
15 -
 16
16 -
 17
17 -
 18
18 -
 19
19 -
 20
20 -
 21
21 -
 22
22 -
23
-
24
-
25
-
26
-
27
-
28
-
29
-
30
-
31
-
32
-
33
-
34
-
35
-
36
-
37
-
38
-
39
-
40
-
41
-
42
-
43
-
44
-
45
-
46
-
47
-
48
-
49
-
50
-
51
-
52
-
53
-
54
-
55
-
56
-
57
-
58
-
59
-
60
-
61
-
62
-
63
-
64
-
65
-
66
-
67
-
68
-
69
-
70
-
71
-
72
-
73
-
74
-
75
-
76
 |
 |

17
US
Getting Started
Step 2: Connecting the System
For connecting the system, read the information on the following pages.
Do not connect the AC power cord (mains lead) of the unit to a wall outlet (mains) until all the other
connections are made.
Note
• When you connect another component with a volume control, turn down the volume of the other components to a
level where sound is not distorted.
To remove the panel cover of the unit
Before connecting the cables, remove the panel cover from the unit.
Note
• Before using the unit, remove the seal attached at the lower rear of the unit.
Hold the panel cover at (
A
), then slide it out to
the side.
A