Sony CCD-FX310 Primary User Manual - Page 6
Milli1:11
 |
View all Sony CCD-FX310 manuals
Add to My Manuals
Save this manual to your list of manuals |
Page 6 highlights
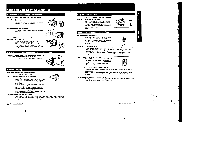
Installing the Lithium Battery To keep birth dates in the camcorders memory and to activate the clock. the lithium battery must be installed. 1 Remove the lithium battery holder located at the bottom of the camcorder. 2 Install the supplied CR2025 lithium battery with the a side facing down. O syle -sad 3 Put the lithium battery holder into the camcorder. Lithium battery life The battery wittiest for approximately 1 year in normal operation. When the lithium battery becomes weak, the et. indicator will blink in the viewfinder screen for about 5 seconds when you set the POWER switch to CAMERA. In this case, replace the battery with a Sony CR2025 or Duracell DL-2025. Use of any other battery may present a risk at tire or explosion. When replacing the lithium battery. keep the battery pack or other power source attached. Otherwise. resetting the date. time and blab dates will be necessary. Changing the lithium battery Remove the lithium battery holder from the camcorder. and pull out the lithium battery and ,,sort a new one. WARNING Battery may explode it mistreated. Do rrsl ...MO. disessembie. or (lisp:soot in fire. Cautions • Keep the lithium battery out Of the reach of Mellen Should the batten/ be wake/ed. immediately consult a doctor • Do rut hold the battery well metallic tweezers. otherwise a shocheimuil may =al 10 GethnSlarR. Setting the Date and Time You need to set your camcorder's date and time to be able to superimpose the date and time onto your video Make sure that the power source and lithium battery are attached 3,4,5,6 •. . Os 1 Press the small green button on the POWER switch and slide the POWER switch to CAMERA. 2 Set the STANDBY switch up. 3 Press DATE (0) and TIME (NEXT) simultaneously for a few seconds until the date indicator appears in the viewfinder. The DATE button now functions as + (to advance numbers) and the TIME button functions as NEXT (to set) 4 Adjust the blinking digits of the year, month, day, and hour by using DATE (A), and by pressing TIME (NEXT). 0 ,- No. • When you keep DATE lel pressed. the digits advance taste, • The year starts at 1992 and proceeds a. follows: 1992-- -(1999-,2000- •2020 2 Milli1: 1,1111 II=or MI 5 Adjust the blinking digits of minute by pressing DATE (a). 6 Press TIME (NEXT) to set the second to "Kr. The clock starts operating. Correcting the date and time settings Repeat steps 3 to 6 Gelling Started 1 1
-
 1
1 -
 2
2 -
 3
3 -
 4
4 -
 5
5 -
 6
6 -
 7
7 -
 8
8 -
 9
9 -
 10
10 -
 11
11 -
 12
12 -
13
-
14
-
15
-
16
-
17
-
18
-
19
-
20
-
21
-
22
-
23
-
24
-
25
-
26
 |
 |
