Sony CDX-M800 Service Manual - Page 6
General, Cdx-m800, - remote
 |
View all Sony CDX-M800 manuals
Add to My Manuals
Save this manual to your list of manuals |
Page 6 highlights
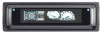
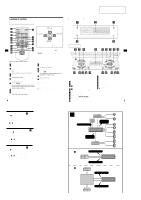
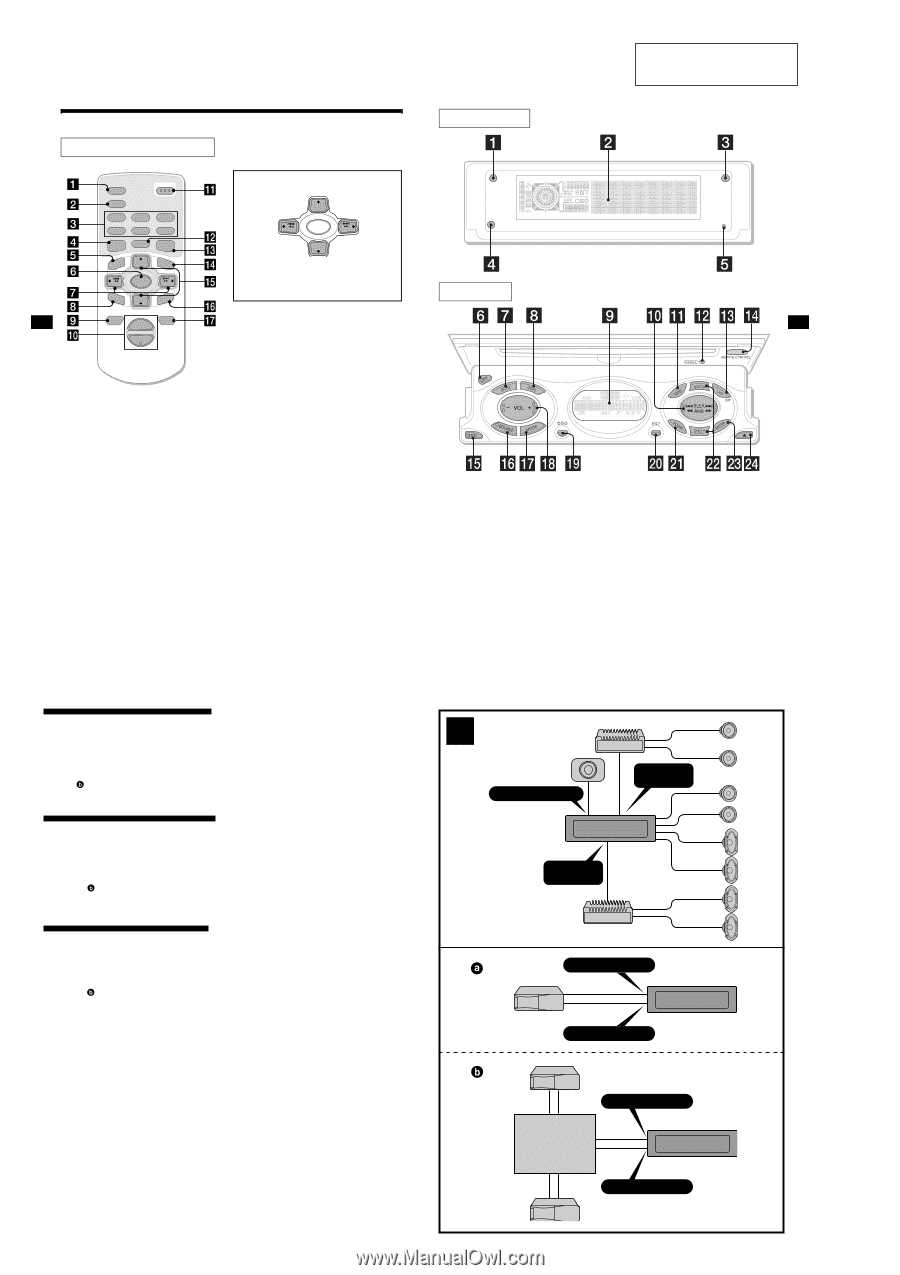
CDX-M800 SECTION 1 GENERAL This section is extracted from instruction manual. Location of controls (US, Canadian Model) Card remote commander RM-X110 SCRL DSPL REP 1 4 EQ7 OPEN/CLOSE SHUF 2 5 MODE 3 6 DSO MENU DISC + LIST SEEK- SOUND SOURCE DISC - SEEK+ ENTER OFF + AT T VOL - Refer to the pages listed for details. a SCRL (scroll) button 10 b DSPL (display mode change) button 10, 12 c Number buttons (1) REP 11 (2) SHUF 11 To store stations/receive stored stations. d EQ7 button 18 e MENU button To display the menus. f SOURCE (Power on/Radio/CD/MD*1/ AUX*2) button To select the source. g SEEK (
-
 1
1 -
 2
2 -
 3
3 -
 4
4 -
 5
5 -
 6
6 -
 7
7 -
 8
8 -
 9
9 -
 10
10 -
 11
11 -
 12
12 -
13
-
14
-
15
-
16
-
17
-
18
-
19
-
20
-
21
-
22
-
23
-
24
-
25
-
26
-
27
-
28
-
29
-
30
-
31
-
32
-
33
-
34
-
35
-
36
-
37
-
38
-
39
-
40
-
41
-
42
-
43
-
44
-
45
-
46
-
47
-
48
-
49
-
50
-
51
-
52
-
53
-
54
 |
 |
6
CDX-M800
4
Location of controls
Refer to the pages listed for details.
a
SCRL (scroll) button
10
b
DSPL (display mode change) button
10, 12
c
Number buttons
(1)
REP
11
(2)
SHUF
11
To store stations/receive stored stations.
d
EQ7 button
18
e
MENU button
To display the menus.
f
SOURCE (Power on/Radio/CD/MD
*
1
/
AUX
*
2
) button
To select the source.
g
SEEK (
<
/
,
) buttons
To skip tracks/fast-forward, reverse a track/
tune in stations automatically, find a station
manually/select a setting.
h
SOUND button
16
i
OFF (Stop/Power off) button
9, 21
j
VOL (+/–) buttons
To turn up or down the volume.
k
OPEN/CLOSE button
9
l
MODE button
To change the operation.
m
DSO button
19
n
LIST button
13, 16
o
DISC (
M
/
m
) buttons
To receive preset stations/change the disc*
3
,
skip albums*
4
/select a menu.
p
ENTER button
To enter a setting.
q
ATT button
17
*1
When an optional MD unit is connected.
*2
Available only when an optional Sony portable
device is connected to BUS AUDIO IN of the unit.
You cannot connect any optional CD/MD units at
the same time.
*3
When an optional CD/MD unit is connected.
*4
Available only when an optional CD unit with the
MP3 file control function is connected, and MP3 file
is played.
Card remote commander RM-X110
DISC
–
AT T
OFF
SCRL
REP
SHUF
DSPL
1
4
MODE
2
5
3
6
SOURCE
DISC
+
SEEK
+
SEEK
–
SOUND
ENTER
MENU
LIST
EQ7
DSO
VOL
+
–
OPEN/CLOSE
DISC
–
SOURCE
DISC
+
SEEK
+
SEEK
–
In menu mode, the currently selectable button(s) of
these four are indicated with a “
v
” in the display.
Note
If the display disappears by pressing
(OFF)
, it cannot
be operated with the card remote commander unless
(SOURCE)
on the unit is pressed, or a disc is inserted
to activate the unit first.
Tip
Refer to “Replacing the lithium battery” for details on
how to replace the batteries (page 22).
(SEEK)
(
<
):
to select
leftwards
(DISC)
(
M
):
to select upwards
(DISC)
(
m
):
to select downwards
(SEEK)
(
,
):
to select
rightwards
SECTION 1
GENERAL
This section is extracted
from instruction manual.
(US, Canadian Model)
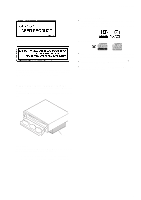
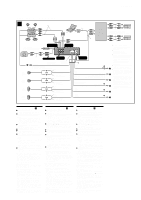
Connection example (US, Canadian Model)
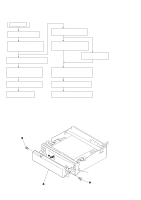
5
The buttons on the unit share the same
functions as those on the card remote
commander.
a
OPEN button
9
b
Main display window
c
IMAGE button
20
d
qf
Receptor for the card remote
commander
e
qs
RESET button
8
f
OFF (Stop/Power off) button
*
1
g
SCRL (scroll) button
h
DSPL (display mode change) button
i
Sub display window
j
SEEK/AMS (
.m
/
M>
) button
k
MENU button
m
LIST/CAT
*
2
button
o
CLOSE (front panel close) button
9
p
SOURCE button
q
MODE button
r
VOL (–/+) button
s
DSO button
t
EQ7 button
u
SOUND button
v
DISC (+/–) buttons
w
ENTER button
x
Z
(eject) button
9
Main display side
Operation side
CDX-M800
continue to next page
t
Connection example (
2
)
Notes
(
2
-A)
• Be sure to connect the ground cord before connecting
the amplifier.
• If you connect an optional power amplifier and do not
use the built-in amplifier, the beep sound will be
deactivated.
Tip
(
2
-B-
)
For connecting two or more CD/MD changers, the source
selector XA-C30 (optional) is necessary.
Exemple de raccordement (
2
)
Remarques
(
2
-A)
•
Raccordez d’abord le fil de masse avant de raccorder
l’amplificateur.
•
Si vous raccordez un amplificateur de puissance en
option et que vous n’utilisez pas l’amplificateur intégré,
le bip sonore est désactivé.
Conseil
(
2
-B-
)
Dans le cas du raccordement de deux changeurs de
CD/MD ou plus, le sélecteur de source XA-C30 (en option)
est requis.
Ejemplo de conexiones (
2
)
Notas
(
2
-A)
•
Asegúrese de conectar primero el cable de puesta a masa
antes de realizar la conexión al amplificador.
•
Si conecta un amplificador de potencia opcional y no utiliza
el incorporado, los pitidos se desactivarán.
Consejo
(
2
-B-
)
Cuando desee conectar dos o más cambiadores de CD/MD,
necesitará un selector de fuente XA-C30 (opcional).
BUS CONTROL IN
BUS AUDIO IN
Source selector
*
Sélecteur de source
*
Selector de fuente
*
XA-C30
*
not supplied
non fourni
no suministrado
2
A
B
AUDIO OUT
FRONT
AUDIO OUT
REAR
BUS AUDIO IN
BUS CONTROL IN
SUB OUT (MONO)