Sony DCR-DVD910 Operating Guide - Page 29
Inserting a Memory Stick PRO, To remove the Memory Stick PRO
 |
UPC - 689466092851
View all Sony DCR-DVD910 manuals
Add to My Manuals
Save this manual to your list of manuals |
Page 29 highlights
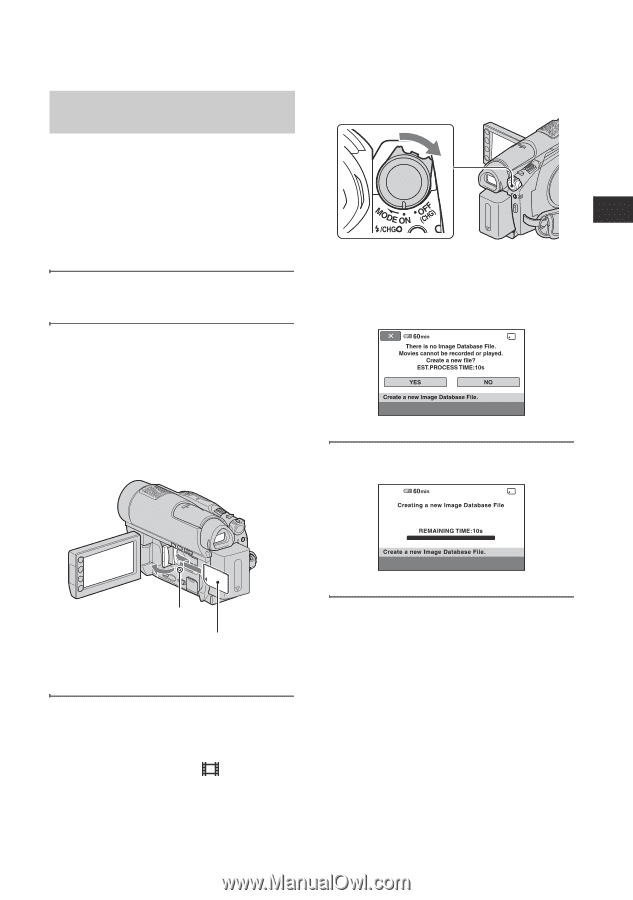
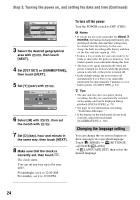
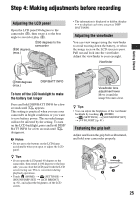
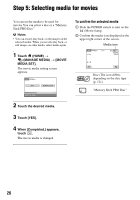
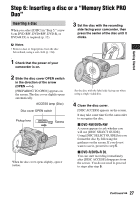
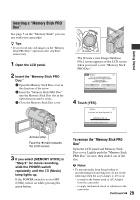
Getting Started Inserting a "Memory Stick PRO Duo" See page 5 on the "Memory Stick" you can use with your camcorder. z Tips • If you record only still images on the "Memory Stick PRO Duo," operations after step 3 are unnecessary. 1 Open the LCD panel. 2 Insert the "Memory Stick PRO Duo." 1 Open the Memory Stick Duo cover in the direction of the arrow. 2 Insert the "Memory Stick PRO Duo" into the Memory Stick Duo slot in the right direction until it clicks. 3 Close the Memory Stick Duo cover. The [Create a new Image Database File.] screen appears on the LCD screen when you insert a new "Memory Stick PRO Duo." 4 Touch [YES]. Access lamp Face the b mark towards the LCD screen. 3 If you select [MEMORY STICK] in "Step 5" for movie recording, slide the POWER switch repeatedly until the (Movie) lamp lights up. If the POWER switch is set to OFF (CHG), turn it on while pressing the green button. To remove the "Memory Stick PRO Duo" Open the LCD panel and Memory Stick Duo cover. Lightly push the "Memory Stick PRO Duo" in once, then slide it out of the slot. b Notes • To prevent media from being broken or recorded images from being lost, do not do the following when the access lamp ( p. 29) is on: - to remove the battery pack or AC Adaptor from the camcorder - to apply mechanical shock or vibration to the camcorder Continued , 29
-
 1
1 -
2
-
3
-
4
-
5
-
6
-
7
-
8
-
9
-
10
-
11
-
12
-
13
-
14
-
15
-
16
-
17
-
18
-
19
-
20
-
21
-
22
-
23
-
 24
24 -
 25
25 -
 26
26 -
 27
27 -
 28
28 -
 29
29 -
 30
30 -
 31
31 -
 32
32 -
 33
33 -
 34
34 -
35
-
36
-
37
-
38
-
39
-
40
-
41
-
42
-
43
-
44
-
45
-
46
-
47
-
48
-
49
-
50
-
51
-
52
-
53
-
54
-
55
-
56
-
57
-
58
-
59
-
60
-
61
-
62
-
63
-
64
-
65
-
66
-
67
-
68
-
69
-
70
-
71
-
72
-
73
-
74
-
75
-
76
-
77
-
78
-
79
-
80
-
81
-
82
-
83
-
84
-
85
-
86
-
87
-
88
-
89
-
90
-
91
-
92
-
93
-
94
-
95
-
96
-
97
-
98
-
99
-
100
-
101
-
102
-
103
-
104
-
105
-
106
-
107
-
108
-
109
-
110
-
111
-
112
-
113
-
114
-
115
-
116
-
117
-
118
-
119
-
120
-
121
-
122
-
123
-
124
-
125
-
126
-
127
-
128
-
129
-
130
-
131
-
132
-
133
-
134
-
135
-
136
-
137
-
138
-
139
-
140
-
141
-
142
-
143
-
144
-
145
-
146
-
147
-
148
-
149
-
150
-
151
 |
 |