Sony DCR-DVD910 Operating Guide - Page 75
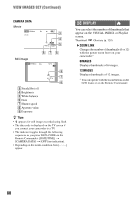
DIGITAL ZOOM, STEADYSHOT, AUTO SLW SHUTTR, GUIDEFRAME, ZEBRA, Customizing Your Camcorder
 |
UPC - 689466092851
View all Sony DCR-DVD910 manuals
Add to My Manuals
Save this manual to your list of manuals |
Page 75 highlights
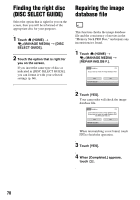
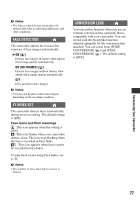
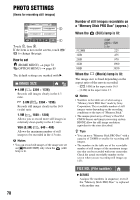
Customizing Your Camcorder DIGITAL ZOOM You can select the maximum zoom level in case you want to zoom greater than optical zoom magnification. Note that the image quality decreases when you use the digital zoom. The right side of the bar shows the digital zooming factor. The zooming zone appears when you select the zooming level. B OFF Up to 15 × zoom is performed optically. 30× Up to 15 × zoom is performed optically, and after that, up to 30 × zoom is performed digitally. 180× Up to 15 × zoom is performed optically, and after that, up to 180 × zoom is performed digitally. STEADYSHOT You can compensate for camera shake. Set [STEADYSHOT] to [OFF] ( ) when using a tripod (optional), then the image becomes natural. The default setting is [ON]. AUTO SLW SHUTTR (Auto slow shutter) When recording in dark places, the shutter speed is automatically reduced to 1/30 second. The default setting is [ON]. GUIDEFRAME You can display the frame and check that the subject is horizontal or vertical by setting [GUIDEFRAME] to [ON]. The frame is not recorded. Press DISP/ BATT INFO to make the frame disappear. The default setting is [OFF]. z Tips • Positioning the subject at the cross point of the guide frame makes a balanced composition. ZEBRA Diagonal stripes appear in portions of the screen where brightness is at a preset level. This is useful as a guide when adjusting the brightness. When you change the default setting, is displayed. The zebra pattern is not recorded. B OFF The zebra pattern is not displayed. 70 The zebra pattern appears at a screen brightness level of about 70 IRE. 100 The zebra pattern appears at a screen brightness level of about 100 IRE or higher. b Notes • Portions of the screen where brightness is about 100 IRE or above may appear overexposed. z Tips • IRE represents the unit of images brightness amplitude. Continued , 75
-
 1
1 -
2
-
3
-
4
-
5
-
6
-
7
-
8
-
9
-
10
-
11
-
12
-
13
-
14
-
15
-
16
-
17
-
18
-
19
-
20
-
21
-
22
-
23
-
24
-
25
-
26
-
27
-
28
-
29
-
30
-
31
-
32
-
33
-
34
-
35
-
36
-
37
-
38
-
39
-
40
-
41
-
42
-
43
-
44
-
45
-
46
-
47
-
48
-
49
-
50
-
51
-
52
-
53
-
54
-
55
-
56
-
57
-
58
-
59
-
60
-
61
-
62
-
63
-
64
-
65
-
66
-
67
-
68
-
69
-
 70
70 -
 71
71 -
 72
72 -
 73
73 -
 74
74 -
 75
75 -
 76
76 -
 77
77 -
 78
78 -
 79
79 -
 80
80 -
81
-
82
-
83
-
84
-
85
-
86
-
87
-
88
-
89
-
90
-
91
-
92
-
93
-
94
-
95
-
96
-
97
-
98
-
99
-
100
-
101
-
102
-
103
-
104
-
105
-
106
-
107
-
108
-
109
-
110
-
111
-
112
-
113
-
114
-
115
-
116
-
117
-
118
-
119
-
120
-
121
-
122
-
123
-
124
-
125
-
126
-
127
-
128
-
129
-
130
-
131
-
132
-
133
-
134
-
135
-
136
-
137
-
138
-
139
-
140
-
141
-
142
-
143
-
144
-
145
-
146
-
147
-
148
-
149
-
150
-
151
 |
 |