Sony DSC M2 User Guide - Page 71
Adding/Changing Music using, Music Transfer, To start up the software
 |
UPC - 027242679160
View all Sony DSC M2 manuals
Add to My Manuals
Save this manual to your list of manuals |
Page 71 highlights
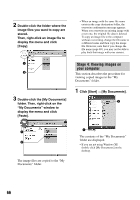
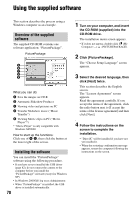
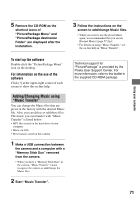
5 Remove the CD-ROM as the shortcut icons of "PicturePackage Menu" and "PicturePackage destination Folder" are displayed after the installation. 3 Follow the instructions on the screen to add/change Music files. • When you want to use the preset Music again, we recommended that you excute [Format Music] (page 57) first. • For details on using "Music Transfer," see the on-line help in "Music Transfer". Using your computer To start up the software Double-click the "PicturePackage Menu" icon on the desktop. For information on the use of the software Click [?] at the upper-right corner of each screen to show the on-line help. Adding/Changing Music using "Music Transfer" You can change the Music files that are preset at the factory with the desired Music file. Also, you can delete or add these files. The music you can transfer with "Music Transfer" is listed below: • MP3 files stored on the hard drive of your computer • Music on CDs • Preset-music saved on this camera 1 Make a USB connection between the camera and a computer with a "Memory Stick Duo" removed from the camera. • When you have a "Memory Stick Duo" in the camera, "Music Transfer" cannot recognize the camera to add/change the Music files. 2 Start "Music Transfer". Technical support for "PicturePackage" is provided by the Pixela User Support Center. For more informaion, refer to the leaflet in the supplied CD-ROM package. 71
-
 1
1 -
2
-
3
-
4
-
5
-
6
-
7
-
8
-
9
-
10
-
11
-
12
-
13
-
14
-
15
-
16
-
17
-
18
-
19
-
20
-
21
-
22
-
23
-
24
-
25
-
26
-
27
-
28
-
29
-
30
-
31
-
32
-
33
-
34
-
35
-
36
-
37
-
38
-
39
-
40
-
41
-
42
-
43
-
44
-
45
-
46
-
47
-
48
-
49
-
50
-
51
-
52
-
53
-
54
-
55
-
56
-
57
-
58
-
59
-
60
-
61
-
62
-
63
-
64
-
65
-
 66
66 -
 67
67 -
 68
68 -
 69
69 -
 70
70 -
 71
71 -
 72
72 -
 73
73 -
 74
74 -
 75
75 -
 76
76 -
77
-
78
-
79
-
80
-
81
-
82
-
83
-
84
-
85
-
86
-
87
-
88
-
89
-
90
-
91
-
92
-
93
-
94
-
95
-
96
-
97
-
98
-
99
-
100
-
101
-
102
-
103
-
104
-
105
-
106
-
107
 |
 |
