Sony DSC-T90/T Cyber-shot® Handbook - Page 123
Viewing an image by connecting the camera to an, HD TV using the HDMI Cable sold separately
 |
UPC - 027242749290
View all Sony DSC-T90/T manuals
Add to My Manuals
Save this manual to your list of manuals |
Page 123 highlights
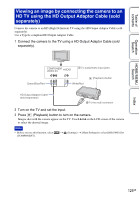
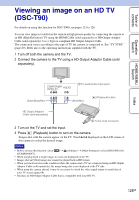
Table of contents Operation Search HOME/MENU Search Viewing an image by connecting the camera to an HD TV using the HDMI Cable (sold separately) Connect the camera to the HDMI terminal of an HD TV using the HDMI Cable (sold separately). 1 Attach the camera to the multi-output stand (supplied). 2 Connect the multi-output stand to the TV using the HDMI Cable (sold separately). the HDMI jack (Playback) button 1 To the HDMI jack Multi-output stand (supplied) 2 To the HDMI jack HDMI Cable (sold separately) 3 Turn on the TV and set the input. 4 Press (Playback) button to turn on the camera. Images shot with the camera appear on the TV. Touch / displayed on the LCD screen of this camera to select the desired image. Notes • Select t (Settings) t [Main Settings] to select [Auto] or [1080i] for [HDMI Resolution]. • The beep sound is fixed to [Shutter]. • Do not connect the camera and equipment to be connected using output terminals. When the camera and TV are connected using output terminals, no video and sound are produced. Such a connection can also cause trouble of the camera and/or connected equipment. • This function may not work properly with some HD TVs. For example, you may not be able to view a video on your HD TV or hear sound from the HD TV. • Use an HDMI Cable with the HDMI logo. Index 123GB
-
 1
1 -
2
-
3
-
4
-
5
-
6
-
7
-
8
-
9
-
10
-
11
-
12
-
13
-
14
-
15
-
16
-
17
-
18
-
19
-
20
-
21
-
22
-
23
-
24
-
25
-
26
-
27
-
28
-
29
-
30
-
31
-
32
-
33
-
34
-
35
-
36
-
37
-
38
-
39
-
40
-
41
-
42
-
43
-
44
-
45
-
46
-
47
-
48
-
49
-
50
-
51
-
52
-
53
-
54
-
55
-
56
-
57
-
58
-
59
-
60
-
61
-
62
-
63
-
64
-
65
-
66
-
67
-
68
-
69
-
70
-
71
-
72
-
73
-
74
-
75
-
76
-
77
-
78
-
79
-
80
-
81
-
82
-
83
-
84
-
85
-
86
-
87
-
88
-
89
-
90
-
91
-
92
-
93
-
94
-
95
-
96
-
97
-
98
-
99
-
100
-
101
-
102
-
103
-
104
-
105
-
106
-
107
-
108
-
109
-
110
-
111
-
112
-
113
-
114
-
115
-
116
-
117
-
 118
118 -
 119
119 -
 120
120 -
 121
121 -
 122
122 -
 123
123 -
 124
124 -
 125
125 -
 126
126 -
 127
127 -
 128
128 -
129
-
130
-
131
-
132
-
133
-
134
-
135
-
136
-
137
-
138
-
139
-
140
-
141
-
142
-
143
-
144
-
145
-
146
-
147
-
148
-
149
-
150
-
151
-
152
-
153
-
154
-
155
-
156
-
157
-
158
-
159
-
160
-
161
-
162
-
163
-
164
-
165
-
166
-
167
-
168
-
169
-
170
 |
 |
