Sony FDR-AX1 Operating Guide - Page 23
Setting the Clock, Attaching Devices, Attaching the lens hood with lens cover, cover - release date
 |
View all Sony FDR-AX1 manuals
Add to My Manuals
Save this manual to your list of manuals |
Page 23 highlights
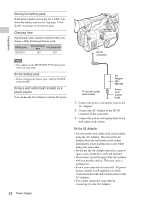
Preparations Setting the Clock Attaching Devices When you turn the camcorder on for the first time after purchasing or the backup battery has completely discharged, the Initial Setting display appears on the viewfinder screen and LCD screen. Set the date and time of the built-in clock, using this display. Time Zone The value shows the time difference from UTC (Coordinated Universal Time). Change the setting if needed. Setting the time and date Clock starts after you turn the SEL/SET dial (page 16) to select the items or value, then press the SEL/SET dial to set them. After the setting display disappears, "Clock Set" (page 47) in the System menu can be used to set "Time Zone" and date/time. Notes • If the clock setting is cleared because the backup battery fully discharged when no power was supplied (no battery pack and no DC IN connection), the Initial Setting display will be displayed when you next turn the camcorder on. • While the Initial Setting display is shown, no other operation, except turning the power off, is permitted until you finish the setting for this display. Attaching the lens hood with lens cover PUSH (lens hood release) button Align the marks on the lens hood to those on the camcorder, and turn the lens hood in the direction of the arrow 2 until it is locked. Opening or closing the shutter of the lens hood with lens cover Move the lens cover lever to OPEN to open the lens cover, and move the lever to CLOSE to close the lens cover. Removing the lens hood with lens cover Turn the lens hood in the opposite direction to the arrow 2 in the illustration while pressing the PUSH (lens hood release) button. Notes • Remove the lens hood with lens cover when you attach/detach a 72mm polarized filter or protective filter. Setting the Clock / Attaching Devices 23
-
 1
1 -
2
-
3
-
4
-
5
-
6
-
7
-
8
-
9
-
10
-
11
-
12
-
13
-
14
-
15
-
16
-
17
-
 18
18 -
 19
19 -
 20
20 -
 21
21 -
 22
22 -
 23
23 -
 24
24 -
 25
25 -
 26
26 -
 27
27 -
 28
28 -
29
-
30
-
31
-
32
-
33
-
34
-
35
-
36
-
37
-
38
-
39
-
40
-
41
-
42
-
43
-
44
-
45
-
46
-
47
-
48
-
49
-
50
-
51
-
52
-
53
-
54
-
55
-
56
-
57
-
58
-
59
-
60
-
61
-
62
-
63
-
64
-
65
-
66
-
67
-
68
 |
 |
