Sony FDR-AX1 Operating Guide - Page 33
Audio setup, Using the internal microphone, Recording sound from an external audio, device
 |
View all Sony FDR-AX1 manuals
Add to My Manuals
Save this manual to your list of manuals |
Page 33 highlights
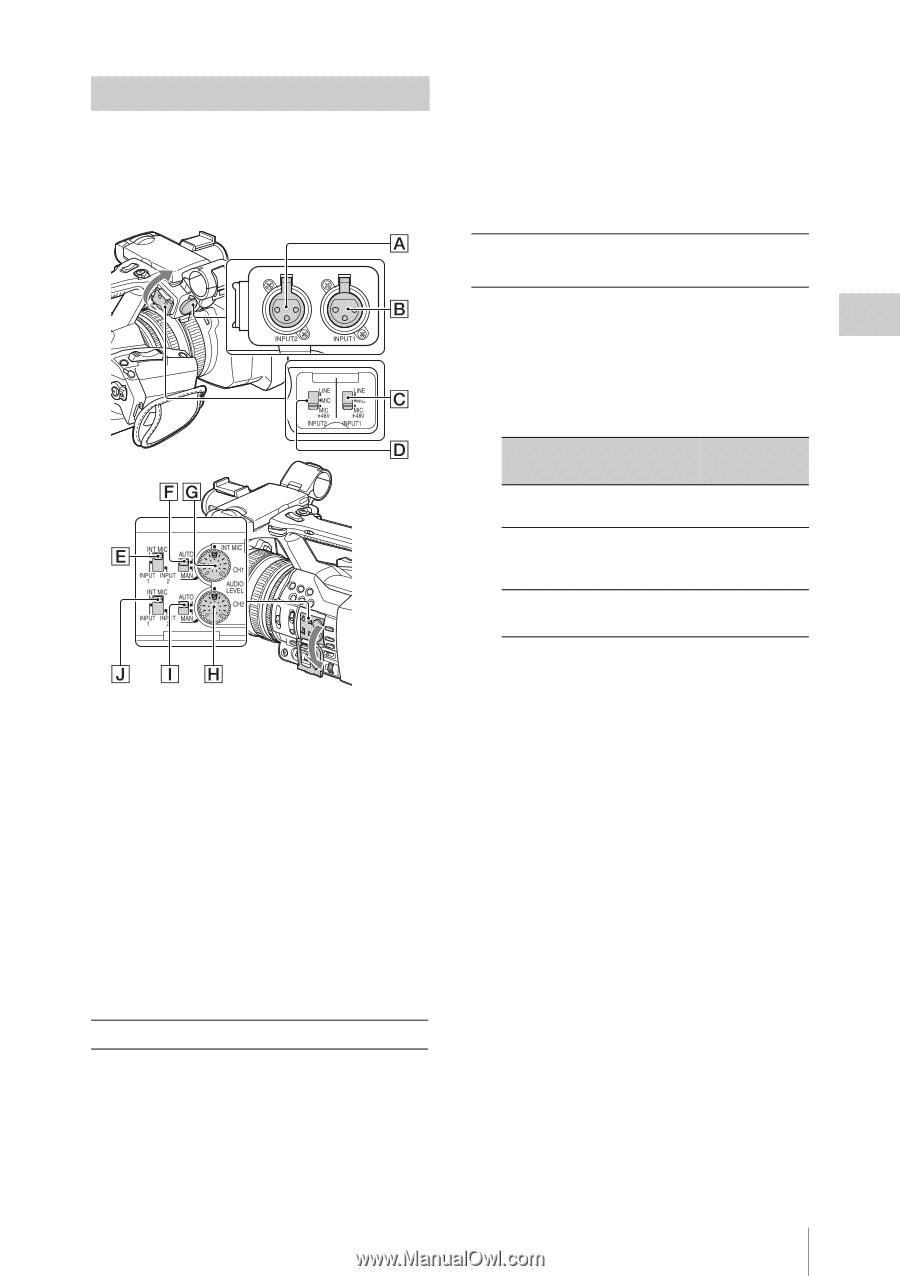
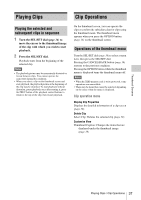
Recording Audio setup The following connectors, switches and dials allow you to set the sound to be recorded. • If the recording level is low, set "INT MIC Sensitivity" in "Audio Input" of the Audio menu to "High" (page 44). • To reduce wind roar, set "INT MIC Wind Filter" in "Audio Input" of the Audio menu to "On" (page 44). External audio input jacks and switches INPUT 1 jack B INPUT 2 jack A INPUT 1 switch C INPUT 2 switch D Audio source switches CH1 (INT MIC/INPUT 1/INPUT 2) switch E CH2 (INT MIC/INPUT 1/INPUT 2) switch J Audio level controls CH1 (AUTO/MAN) switch F CH2 (AUTO/MAN) switch I AUDIO LEVEL (CH1) dial G AUDIO LEVEL (CH2) dial H Using the internal microphone The sound will be recorded in stereo when using the internal microphone. Set the CH1 (INT MIC/INPUT 1/INPUT 2) and CH2 (INT MIC/INPUT 1/INPUT 2) switches to INT MIC. Recording sound from an external audio device To use an external audio device, or a microphone (sold separately), change the settings as follows. 1. Select the input source. Set the INPUT 1/INPUT 2 switches according to the devices connected to the INPUT 1/INPUT 2 jacks. Audio devices Switch position External audio device (mixer, LINE etc.) Dynamic microphones or MIC microphones with a built-in battery +48V powering (Phantom MIC+48V powering) microphone • If you connect a device that does not support +48V phantom power, malfunction may result from setting this switch to MIC+48V. Check before connecting the device. • When there is no audio device connected to an INPUT jack, set the INPUT switch of that jack to LINE to prevent noise. 2. Set the input level of the microphone. • Set the input level of the microphone by "INPUT1 Reference/INPUT2 Reference" in "Audio Input" of the Audio menu (page 44). Adjust according to the sensitivity of the microphone. 3. Select the channel you want to record. Using the CH1/CH2 switches, select the source to be recorded on each channel. Changing Basic Settings 33
-
 1
1 -
2
-
3
-
4
-
5
-
6
-
7
-
8
-
9
-
10
-
11
-
12
-
13
-
14
-
15
-
16
-
17
-
18
-
19
-
20
-
21
-
22
-
23
-
24
-
25
-
26
-
27
-
 28
28 -
 29
29 -
 30
30 -
 31
31 -
 32
32 -
 33
33 -
 34
34 -
 35
35 -
 36
36 -
 37
37 -
 38
38 -
39
-
40
-
41
-
42
-
43
-
44
-
45
-
46
-
47
-
48
-
49
-
50
-
51
-
52
-
53
-
54
-
55
-
56
-
57
-
58
-
59
-
60
-
61
-
62
-
63
-
64
-
65
-
66
-
67
-
68
 |
 |