Sony FDR-AX1 Operating Guide - Page 31
Adjusting to natural color (White balance), Adjusting the shutter speed, Adjusting the volume of light
 |
View all Sony FDR-AX1 manuals
Add to My Manuals
Save this manual to your list of manuals |
Page 31 highlights
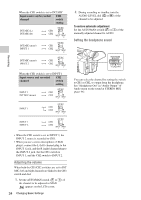
Recording Notes • When you set AUTO/MANUAL switch H to AUTO, other manually adjusted items (iris, shutter speed, white balance) also become automatic. Adjusting the shutter speed You can manually adjust and fix the shutter speed. You can make a moving subject look still or emphasize the movement of a moving subject by adjusting the shutter speed. 1. During recording or standby, set the AUTO/ MANUAL switch H to MANUAL. 2. Press the SHUTTER SPEED button D to display the Shutter Value. 3. Change the Shutter Value displayed on the screen by turning the SEL/SET dial G. You can adjust the shutter speed in a range of 1/4 second through 1/9000 second (NTSC Area) and 1/3 second through 1/9000 second (PAL Area). The set Shutter Value appears on the screen. For example, "1/100" appears on the screen when you set the shutter speed to 1/100 second. The larger the denominator value on the screen, the faster the shutter speed. 4. Press the SEL/SET dial G to lock the Shutter Value. To readjust the shutter speed, do steps 2 to 4. • The shutter speed range that can be set depends on the frame rate. • It is difficult to focus automatically at a lower shutter speed. Manual focusing with your camcorder attached to a tripod is recommended. • When recording under fluorescent lamps, sodium lamps, or mercury lamps, the picture may flicker or change colors, or may have horizontal bands of noise. You may be able to improve the situation by adjusting the shutter speed. To adjust the shutter speed automatically Press the SHUTTER SPEED button D twice, or set the AUTO/MANUAL switch H to AUTO. The Shutter Value disappears. When the shutter speed is automatically adjusted, "A.SHT" is displayed. Notes • When you set the AUTO/MANUAL switch H to AUTO, other manually adjusted items (iris, gain, white balance) also become automatic. Adjusting the volume of light (ND filter) You can record the subject clearly by using the ND FILTER switch B when the recording environment is too bright. OFF: ND filter is not used. 1: Reduce the amount of light to 1/4. 2: Reduce the amount of light to 1/16. 3: Reduce the amount of light to 1/64. While the iris is automatically adjusted, the "Video Level Warning" is displayed. If ND OFF flashes, set the ND FILTER switch to OFF. The ND filter icon will disappear from the screen. Notes • If you change the ND FILTER switch B during recording, the movie and sound may be distorted. • When adjusting the iris manually, the "Video Level Warning" is not displayed even if the light volume should be adjusted with the ND FILTER switch. While recording a bright subject, diffraction may occur if you close the aperture further down, resulting in a fuzzy focus (this is a common phenomenon with video cameras). The ND FILTER switch B suppresses this phenomenon and gives better recording results. Adjusting to natural color (White balance) Changing Basic Settings 31
-
 1
1 -
2
-
3
-
4
-
5
-
6
-
7
-
8
-
9
-
10
-
11
-
12
-
13
-
14
-
15
-
16
-
17
-
18
-
19
-
20
-
21
-
22
-
23
-
24
-
25
-
 26
26 -
 27
27 -
 28
28 -
 29
29 -
 30
30 -
 31
31 -
 32
32 -
 33
33 -
 34
34 -
 35
35 -
 36
36 -
37
-
38
-
39
-
40
-
41
-
42
-
43
-
44
-
45
-
46
-
47
-
48
-
49
-
50
-
51
-
52
-
53
-
54
-
55
-
56
-
57
-
58
-
59
-
60
-
61
-
62
-
63
-
64
-
65
-
66
-
67
-
68
 |
 |
