Sony FDR-AX1 Operating Guide - Page 27
Recording, Basic Operation Procedure
 |
View all Sony FDR-AX1 manuals
Add to My Manuals
Save this manual to your list of manuals |
Page 27 highlights
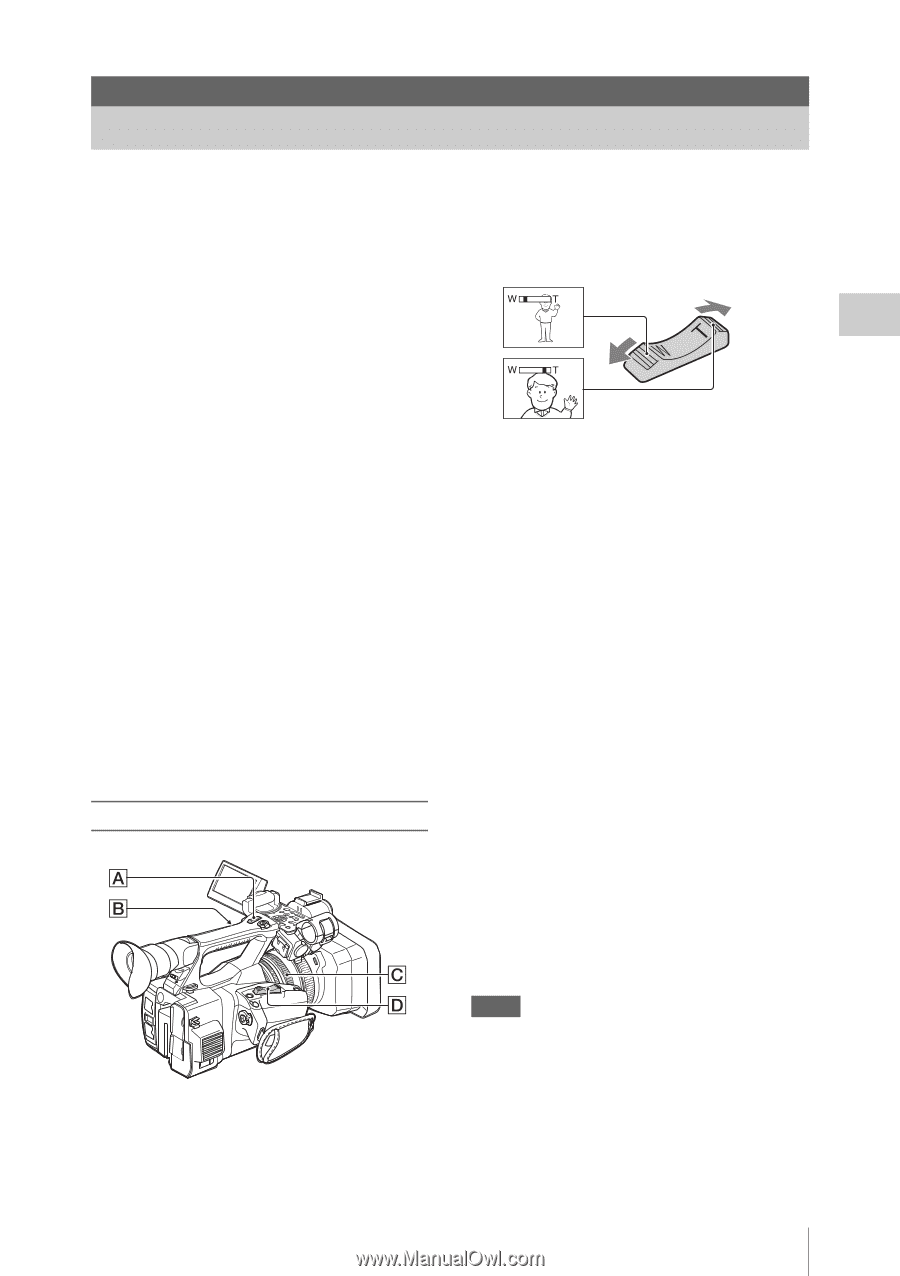
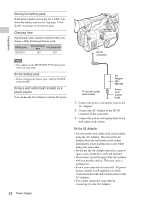
Recording Recording Basic Operation Procedure Basic recording can be performed with the following procedures. 1 Make sure that the necessary devices are attached to the camcorder and power is supplied to them. 2 Load the memory card(s). If you load two cards, recording is continued by automatically switching to the second card when the first card becomes full. 3 Open the shutter of the lens hood with lens cover. 4 Slide the POWER switch to ON while pressing the green button. The recording screen is displayed on the LCD/viewfinder screen. 5 Press the record button (page 14). The recording lamp lights and recording begins. 6 To stop recording, press the record button again. Recording stops and the camcorder enters STBY (recording standby) mode. Adjusting the zoom To use the power zoom lever Move the power zoom lever D slightly for a slower zoom. Move it further for a faster zoom. Wide view: (Wide angle) Close view: (Telephoto) • The minimum distance required between your camcorder and the subject for focus is about 1 cm (about 13/32 in.) for wide angle and about 80 cm (about 2 5/8 feet) for telephoto. • The focus may not be adjusted at certain zoom positions if the subject is within 80 cm (about 2 5/8 feet) from your camcorder. • Be sure to keep your finger on the power zoom lever D. If you move your finger off the power zoom lever D, the operation sound of the power zoom lever D may also be recorded. To use the handle zoom 1. Set the handle zoom switch B to VAR or FIX. • When you set the handle zoom switch B to VAR, you can zoom in or out at variable speed. • When you set the handle zoom switch B to FIX, you can zoom in or out at fixed speed, as set in "Setting" in "Handle Zoom" of the Camera menu (page 41). 2. Press the handle zoom lever A to zoom in or out. Notes • You cannot use the handle zoom lever A when the handle zoom switch B is set to OFF. • You cannot change the zoom speed of the power zoom lever D with the handle zoom switch B. Using the zoom ring You can zoom at the desired speed by turning the zoom ring C. Fine adjustment is also possible. Basic Operation Procedure 27
-
 1
1 -
2
-
3
-
4
-
5
-
6
-
7
-
8
-
9
-
10
-
11
-
12
-
13
-
14
-
15
-
16
-
17
-
18
-
19
-
20
-
21
-
 22
22 -
 23
23 -
 24
24 -
 25
25 -
 26
26 -
 27
27 -
 28
28 -
 29
29 -
 30
30 -
 31
31 -
 32
32 -
33
-
34
-
35
-
36
-
37
-
38
-
39
-
40
-
41
-
42
-
43
-
44
-
45
-
46
-
47
-
48
-
49
-
50
-
51
-
52
-
53
-
54
-
55
-
56
-
57
-
58
-
59
-
60
-
61
-
62
-
63
-
64
-
65
-
66
-
67
-
68
 |
 |