Sony FWD-50PX2 User Manual - Page 19
Initial Setup/information - screen
 |
View all Sony FWD-50PX2 manuals
Add to My Manuals
Save this manual to your list of manuals |
Page 19 highlights
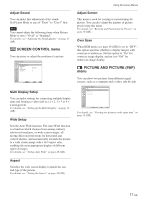
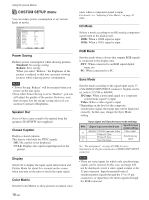
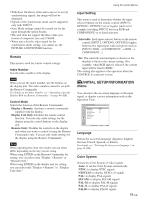
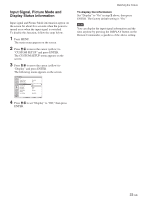
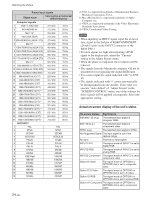
• With Sync On Green, if the unit is not set to accept synchronizing signals, the image will not be displayed. • Signals of the synchronous mode can be supported only with INPUT2. • Sync Mode settings cannot be carried out for the input through the option boards. • This unit does not support the three value sync format of composite sync and 576/60P. • When you select the video signal for the synchronous mode setting, you cannot use the PICTURE AND PICTURE function. Remote This menu is used for remote control settings. Index Number Sets the index number of the display. Note When you set the index number, use the buttons on the display unit. The index number cannot be set with the Remote Commander. For details on the Index Number, see "Operating a Specific Display With the Remote Commander" on page 44 (GB). Control Mode Selects the function of the Remote Commander. Display + Remote: Activates a remote commander supplied with the display. Display Unit Only: Disables the remote control function. You can only make settings for the display using the control buttons on the display unit. Remote Only: Disables the controls on the display unit when you want to control it using the Remote Commander only. You can only make settings for the display using the Remote Commander. Note When operating this item, the modes you can select differ depending on the key you are using. When using ENTER on the Remote Commander for setting, you can select only "Display + Remote" or "Remote Only." When using ENTER on the display unit for setting, you can select only "Display + Remote" or "Display Unit Only." Using On-screen Menus Input Setting This menu is used to determine whether the input selector buttons on the remote control (INPUT2, OPTION1, OPTION2) act as toggles (such as for example switching INPUT2 between RGB and COMPONENT) or as fixed selectors. Selectable: Each input selector button on the remote control (INPUT2, OPTION1, OPTION2) toggles between two input types with each press (such as INPUT2: RGB t COMPONENT t RGB t COMPONENT...). Fix: The currently selected input (as shown on the display) is fixed to the current setting. (For example, when RGB input is selected, the current input will be fixed to RGB.) This setting also applies to the operation when the CONTROL S connector is used. INITIAL SETUP/INFORMATION menu You can select the on-screen language or the input signal, or display various information such as the Operation Time. INITIAL SETUP/INFORMATION Language: Color System: Auto Shut Off: Auto Screen Adjust: Information IP Address Setup Speed Setup All Reset English Auto Off On Select Set ENTER Exit MENU Language Selects the on-screen language (Japanese, English, German, French, Spanish, or Italian). For details, see "Selecting the On-screen Language" on page 36 (GB). Color System Selects the Color System of video signals. Auto: to set the Color System automatically. NTSC: to display NTSC signals NTSC4.43: to display NTSC4.43 signals PAL: to display PAL signals SECAM: to display SECAM signals PAL-M: to display PAL-M signals PAL-N: to display PAL-N signals PAL60: to display PAL60 signals 19 (GB)
-
 1
1 -
2
-
3
-
4
-
5
-
6
-
7
-
8
-
9
-
10
-
11
-
12
-
13
-
 14
14 -
 15
15 -
 16
16 -
 17
17 -
 18
18 -
 19
19 -
 20
20 -
 21
21 -
 22
22 -
 23
23 -
 24
24 -
25
-
26
-
27
-
28
-
29
-
30
-
31
-
32
-
33
-
34
-
35
-
36
-
37
-
38
-
39
-
40
-
41
-
42
-
43
-
44
-
45
-
46
-
47
-
48
-
49
-
50
 |
 |
