Sony FWD-50PX2 User Manual - Page 41
Turning the screen all white, Adjusting the brightness of, background of picture, Lowering
 |
View all Sony FWD-50PX2 manuals
Add to My Manuals
Save this manual to your list of manuals |
Page 41 highlights
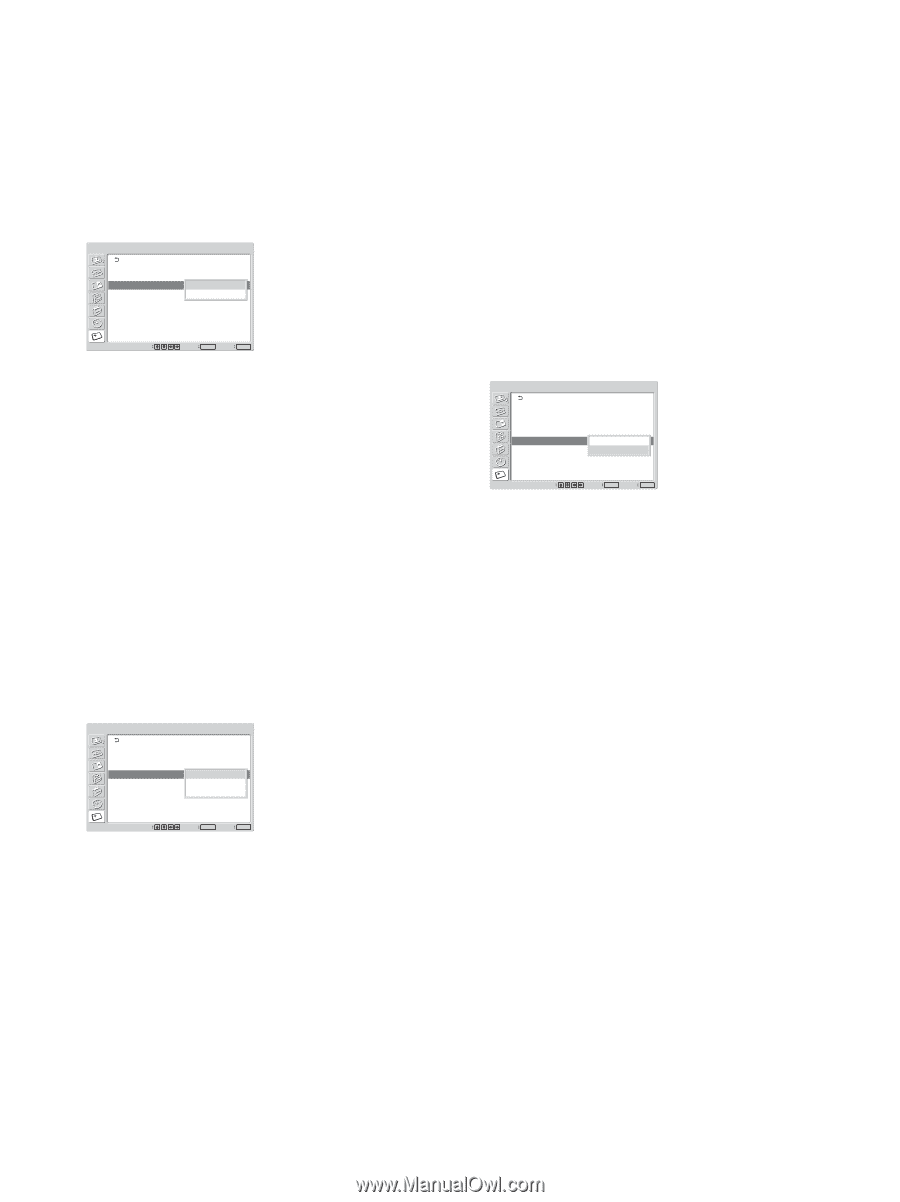
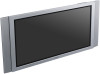
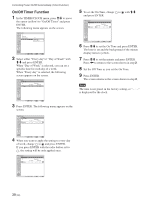
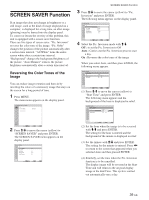
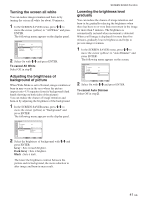
Turning the screen all white You can reduce image retention and burn-in by turning the screen all white for about 30 minutes. 1 In the SCREEN SAVER menu, press M/m to move the cursor (yellow) to "All White" and press ENTER. The following menu appears on the display panel. SCREEN SAVER Pic. Inversion: Off Pic. Orbit All White: Off Background: OGnray Auto Dimmer: On Select Set ENTER Exit MENU 2 Select On with M/m and press ENTER. To cancel All White Select Off in step 2. Adjusting the brightness of background of picture When Wide Mode is set to Normal, image retention or burn-in may occur in the area where the picture (aspect ratio 4:3) separates from its background (dark bands showing on both sides of the picture). You can reduce the chance of image retention and burn-in by adjusting the brightness of the background. 1 In the SCREEN SAVER menu, press M/m to move the cursor (yellow) to "Background" and press ENTER. The following menu appears on the display panel. SCREEN SAVER Pic. Inversion: Pic. Orbit All White: Background: Auto Dimmer: Off Off Gray DOanrk Gray Black Select Set ENTER Exit MENU 2 Select the brightness of background with M/m and press ENTER. Gray : Sets it much brighter. Dark Gray : Sets it brighter. Black : Sets it dark. The lower the brightness contrast between the picture and its background, the more reduction in after image and burn-in may result. SCREEN SAVER Function Lowering the brightness level gradually You can reduce the chance of image retention and burn-in by gradually reducing the brightness when there has been no or very little movement in the image for more than 5 minutes. The brightness is automatically restored when movement is detected. When a still image is displayed for more than five minutes, gradually lowers brightness and helps to prevent image retention. 1 In the SCREEN SAVER menu, press M/m to move the cursor (yellow) to "Auto Dimmer" and press ENTER. The following menu appears on the screen. SCREEN SAVER Pic. Inversion: Off Pic. Orbit All White: Off Background: Gray Auto Dimmer: Ofnf On Select Set ENTER Exit MENU 2 Select On with M/m and press ENTER. To cancel Auto Dimmer Select Off in step 2. 41 (GB)
-
 1
1 -
2
-
3
-
4
-
5
-
6
-
7
-
8
-
9
-
10
-
11
-
12
-
13
-
14
-
15
-
16
-
17
-
18
-
19
-
20
-
21
-
22
-
23
-
24
-
25
-
26
-
27
-
28
-
29
-
30
-
31
-
32
-
33
-
34
-
35
-
 36
36 -
 37
37 -
 38
38 -
 39
39 -
 40
40 -
 41
41 -
 42
42 -
 43
43 -
 44
44 -
 45
45 -
 46
46 -
47
-
48
-
49
-
50
 |
 |