Sony FWD-50PX2 User Manual - Page 42
Setting an IP address and, communication speed - error code
 |
View all Sony FWD-50PX2 manuals
Add to My Manuals
Save this manual to your list of manuals |
Page 42 highlights
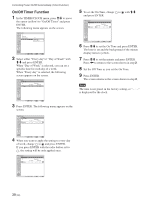
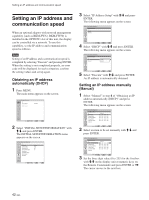
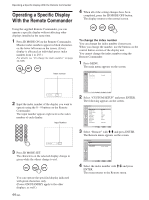
Setting an IP address and communication speed Setting an IP address and communication speed When an optional adaptor with network management capability (such as BKM-FW32, BKM-FW50) is installed in the OPTION1 slot of this unit, the display can be controlled via a network. To use this capability, set the IP address and communication speed as follows. Note Setting of an IP address and a communication speed is completed by selecting "Execute" and pressing ENTER. When the setting is not completed properly, an error code will be displayed. In such a situation, confirm the setting values and set up again. Obtaining an IP address automatically (DHCP) 1 Press MENU. The main menu appears on the screen. PICTURE/SOUND CONTROL Picture Mode: Adjust Picture Adjust Sound Standard Select Set ENTER Exit MENU 2 Select "INITIAL SETUP/INFORMATION" with M/m and press ENTER. The INITIAL SETUP/INFORMATION menu appears on the screen. INITIAL SETUP/INFORMATION Language: Color System: Auto Shut Off: Auto Screen Adjust: Information IP Address Setup Speed Setup All Reset English Auto Off On Select Set ENTER Exit MENU 3 Select "IP Address Setup" with M/m and press ENTER. The following menu appears on the screen. INITIAL SETUP/INFORMATION IP Address Setup DHCP Manual Select Set ENTER Exit MENU 4 Select "DHCP" with M/m and press ENTER. The following menu appears on the screen. INITIAL SETUP/INFORMATION IP Address Setup DHCP Manual Cancel Execute Select Set ENTER Exit MENU 5 Select "Execute" with M/m and press ENTER. An IP address is automatically obtained. Setting an IP address manually (Manual) 1 Select "Manual" in step 4 of "Obtaining an IP address automatically (DHCP)" and press ENTER. The following menu appears on the screen. INITIAL SETUP/INFORMATION IP Address Setup IP Address: Subnet Mask: Gateway Address: Primay DNS: Secondary DNS: Execute Manual 000 . 000 . 000 . 000 000 . 000 . 000 . 000 000 . 000 . 000 . 000 000 . 000 . 000 . 000 000 . 000 . 000 . 000 Select Set ENTER Exit MENU 2 Select an item to be set manually with M/m and press ENTER. INITIAL SETUP/INFORMATION IP Address Setup IP Address: Subnet Mask: Gateway Address: Primay DNS: Secondary DNS: Execute Manual 000 . 000 . 000 . 000 000 . 000 . 000 . 000 000 . 000 . 000 . 000 000 . 000 . 000 . 000 000 . 000 . 000 . 000 Select Set ENTER Exit MENU 3 Set the three digit value (0 to 255) for the first box with M/m on the display unit or numeric keys on the Remote Commander and press ENTER or ,. The cursor moves to the next box. 42 (GB)
-
 1
1 -
2
-
3
-
4
-
5
-
6
-
7
-
8
-
9
-
10
-
11
-
12
-
13
-
14
-
15
-
16
-
17
-
18
-
19
-
20
-
21
-
22
-
23
-
24
-
25
-
26
-
27
-
28
-
29
-
30
-
31
-
32
-
33
-
34
-
35
-
36
-
 37
37 -
 38
38 -
 39
39 -
 40
40 -
 41
41 -
 42
42 -
 43
43 -
 44
44 -
 45
45 -
 46
46 -
 47
47 -
48
-
49
-
50
 |
 |