Sony FWD-50PX2 User Manual - Page 40
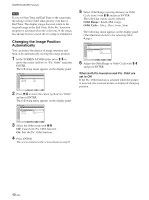
Changing the Image Position, Automatically
 |
View all Sony FWD-50PX2 manuals
Add to My Manuals
Save this manual to your list of manuals |
Page 40 highlights
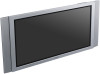
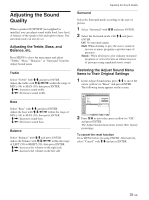
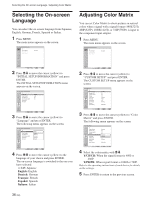
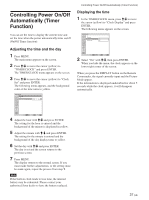
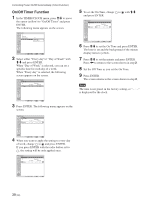
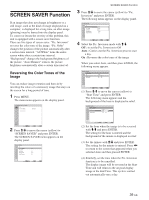
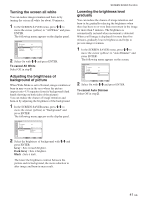
SCREEN SAVER Function Note If you set Start Time and End Time to the same time, the setting of Start Time takes priority over that of End Time. The display image does not return to the original image at the End Time. If the Pic. Inversion program is activated when the color tone of the image has already been reversed, the reversing is terminated. Changing the Image Position Automatically You can reduce the chance of image retention and burn-in by automatically moving the image position. 1 In the SCREEN SAVER menu, press M/m to move the cursor (yellow) to "Pic. Orbit" and press ENTER. The following menu appears on the display panel. SCREEN SAVER Pic. Orbit Orbit: Orbit Range: Orbit Cycle: Off Small 30sec Select Set ENTER Exit MENU 2 Press M/m to move the cursor (yellow) to "Orbit" and press ENTER. The following menu appears on the display panel. SCREEN SAVER Pic. Orbit Orbit: Orbit Range: Orbit Cycle: Off OSmn all 30sec 5 Select Orbit Range (moving distance) or Orbit Cycle (time) with M/m and press ENTER. The following values can be selected. Orbit Range : Small, Mid, Large Orbit Cycle : 10sec, 30sec, 1min, 5min The following menu appears on the display panel. (The illustration below is for selecting Orbit Range.) SCREEN SAVER Pic. Orbit Orbit: Orbit Range: Orbit Cycle: Off Small 3M0idsec Large Select Set ENTER Exit MENU 6 Adjust the Orbit Range or Orbit Cycle with M/m and press ENTER. When both Pic Inversion and Pic. Orbit are set to ON If the Pic. Orbit function is actuated while the picture is reversed, the reversed picture is displayed changing position. Select Set ENTER Exit MENU 3 Select the Orbit mode with M/m. Off: Cancels the Pic. Orbit function. On: Sets the Pic. Orbit function. 4 Press ENTER. The screen returns to the screen shown in step 1. 40 (GB)
-
 1
1 -
2
-
3
-
4
-
5
-
6
-
7
-
8
-
9
-
10
-
11
-
12
-
13
-
14
-
15
-
16
-
17
-
18
-
19
-
20
-
21
-
22
-
23
-
24
-
25
-
26
-
27
-
28
-
29
-
30
-
31
-
32
-
33
-
34
-
 35
35 -
 36
36 -
 37
37 -
 38
38 -
 39
39 -
 40
40 -
 41
41 -
 42
42 -
 43
43 -
 44
44 -
 45
45 -
46
-
47
-
48
-
49
-
50
 |
 |