Sony FWD-50PX2 User Manual - Page 43
Self-diagnosis Function
 |
View all Sony FWD-50PX2 manuals
Add to My Manuals
Save this manual to your list of manuals |
Page 43 highlights
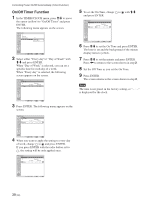
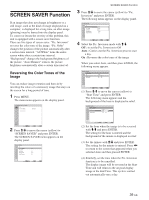
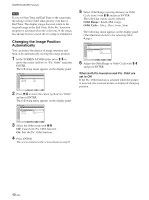
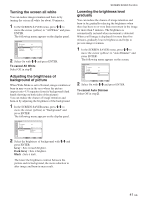
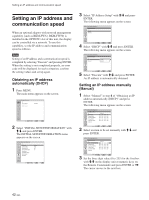
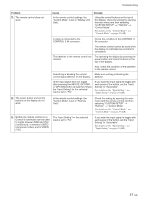
Setting an IP address and communication speed / Self-diagnosis Function INITIAL SETUP/INFORMATION IP Address Setup IP Address: Subnet Mask: Gateway Address: Primay DNS: Secondary DNS: Execute Manual 000 . 000 . 000 . 000 000 . 000 . 000 . 000 000 . 000 . 000 . 000 000 . 000 . 000 . 000 000 . 000 . 000 . 000 Select Set ENTER Exit MENU 4 Set the three digit value (0 to 255) for each of the four boxes and press ENTER. The following menu appears on the screen. INITIAL SETUP/INFORMATION IP Address Setup IP Address: Subnet Mask: Gateway Address: Primay DNS: Secondary DNS: Execute Manual 123 . 123 . 012 . 034 000 . 000 . 000 . 000 000 . 000 . 000 . 000 000 . 000 . 000 . 000 000 . 000 . 000 . 000 Select Set ENTER Exit MENU 5 Select the next item to be set manually with M/m and repeat the same procedure and press ENTER. 6 After values are set for all the desired items, select "Execute" with M/m, then press ENTER. An IP address is set manually. Note When an IP address is not set properly, the following error codes will be displayed in accordance with the error cause. Error 1 Error 2 Error 3 Error 4 Error 5 Error 6 Error 7 Communication error between the display unit and optional adaptor A specified IP address is already used for other device. IP address error Gateway address error Primary DNS address error Secondary DNS address error Subnet mask error Setting a communication speed (Speed Setup) 1 In the INITIAL SETUP/INFORMATION menu, select "Speed Setup" with M/m and press ENTER. INITIAL SETUP/INFORMATION Speed Setup Speed: Execute Auto Detect INITIAL SETUP/INFORMATION Speed Setup Speed: Execute Auto Detect 10Mbps/Half Dup 10Mbps/Full Dup 100Mbps/Half Dup 100Mbps/Full Dup Select Set ENTER Exit MENU 3 Select "Execute" and press ENTER. A communication speed has been set. Self-diagnosis Function The unit has a self-diagnosis function. This function shows the display's condition based on the pattern shown by the flashing of the POWER/ STANDBY indicator. The flashing pattern informs you of the display's current condition. If the POWER/STANDBY indicator flashes in red, check the number of flashes and contact your authorized Sony dealer. 1 Check the flashing pattern of the POWER/ STANDBY indicator. The indicator flashes (with an image showing on the display) or flashes at intervals of three seconds (with no image showing on the display). Count the number of flashes if the indicator flashes at intervals of three seconds. For example, the indicator flashes twice, followed by a three second pause, two more flashes and this pattern repeats. In this case, the count for the number of flashes is two. 2 Unplug the unit. Inform your authorized Sony dealer of the number of flashes. Select Set ENTER Exit MENU 2 Press ENTER and select a communication speed with M/m, then press ENTER. Select "Auto Detect" when you want to set an appropriate communication speed for your network configuration automatically. 43 (GB)
-
 1
1 -
2
-
3
-
4
-
5
-
6
-
7
-
8
-
9
-
10
-
11
-
12
-
13
-
14
-
15
-
16
-
17
-
18
-
19
-
20
-
21
-
22
-
23
-
24
-
25
-
26
-
27
-
28
-
29
-
30
-
31
-
32
-
33
-
34
-
35
-
36
-
37
-
 38
38 -
 39
39 -
 40
40 -
 41
41 -
 42
42 -
 43
43 -
 44
44 -
 45
45 -
 46
46 -
 47
47 -
 48
48 -
49
-
50
 |
 |
