Sony FX52 Operating Instructions - Page 23
Projecting
 |
UPC - 027242684263
View all Sony FX52 manuals
Add to My Manuals
Save this manual to your list of manuals |
Page 23 highlights
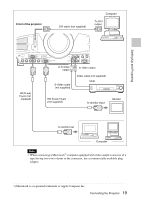
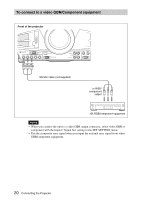
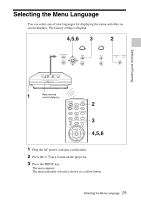
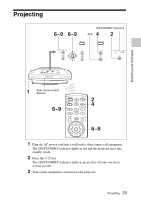
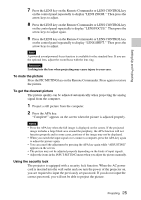
Projecting 6~9 6~9 ON/STANDBY indicators 4 APA 2 TEMP/FAN LAMP/COVER LENS CONTROL RESET MENU ENTER INPUT APA POWER SAVING ON/STANDBY Setting Up and Projecting 1 Rear remote control detector 6~9 COMMAND OFF ON PIC PJ NETWORK MUTING AUDIO INPUT LENS APA TILT/KEYSTONE VOLUME MENU/ TAB AIR SHOT FREEZE 2 4 6~9 1 Plug the AC power cord into a wall outlet, then connect all equipment. The ON/STANDBY indicator lights in red and the projector goes into standby mode. 2 Press the I / 1 key. The ON/STANDBY indicator lights in green after it flashes for about several seconds. 3 Turn on the equipment connected to the projector. Projecting 23
-
 1
1 -
2
-
3
-
4
-
5
-
6
-
7
-
8
-
9
-
10
-
11
-
12
-
13
-
14
-
15
-
16
-
17
-
 18
18 -
 19
19 -
 20
20 -
 21
21 -
 22
22 -
 23
23 -
 24
24 -
 25
25 -
 26
26 -
 27
27 -
 28
28 -
29
-
30
-
31
-
32
-
33
-
34
-
35
-
36
-
37
-
38
-
39
-
40
-
41
-
42
-
43
-
44
-
45
-
46
-
47
-
48
-
49
-
50
-
51
-
52
-
53
-
54
-
55
-
56
-
57
 |
 |

23
Projecting
Setting Up and Projecting
Projecting
1
Plug the AC power cord into a wall outlet, then connect all equipment.
The ON/STANDBY indicator lights in red and the projector goes into
standby mode.
2
Press the
I
/
1
key.
The ON/STANDBY indicator lights in green
after it flashes for about
several seconds
.
3
Turn on the equipment connected to the projector.
MUTING
PIC
AUDIO
LENS
APA
AIR SHOT
INPUT
TILT/KEYSTONE
PJ NETWORK
ON
COMMAND
OFF
VOLUME
MENU/
TAB
FREEZE
2
4
6~9
6~9
RESET
LENS CONTROL
POWER SAVING
ON/STANDBY
MENU
TEMP/FAN
ENTER
APA
LAMP/COVER
INPUT
1
6~9
6~9
4
2
Rear remote control
detector
ON/STANDBY indicators
APA