Sony HDW1800 Installation Manual - Page 10
Rack Mounting
 |
View all Sony HDW1800 manuals
Add to My Manuals
Save this manual to your list of manuals |
Page 10 highlights
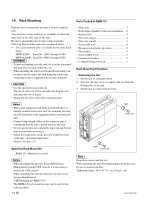
1-6. Rack Mounting Explains how to mount this unit into a 19-inch standard rack. Two positions (center and low) are available to attach the inner rails of the slide rails to this unit. Be sure to mount this unit (*) into a rack accurately following the procedure and notes mentioned below. *: The center position only is available for the units listed below. MSW-A2000 : Serial No. 10001 through 10180 MSW-A2000P : Serial No. 40001 through 40520 w . To prevent toppling over the rack, fix it on the horizontal and firm floor securely with bolts, etc. . When installing the unit in an Outside Broadcasting van, be sure to fix the unit to the rack using the screws and ornamental washers supplied with the rack mount kit. c . Use the specified rack mount rail. The use of other rail of low strength may drop the unit and cause the risk of injury. . Mount the unit into a rack with a steady posture. m . When other equipment with built-in hard disk drive is already mounted in the same rack for mounting this unit, turn off the power of the equipment before mounting this unit. . Connect long enough cables on the connector panel, considering that the unit is pulled out from the rack. . Do not operate this unit without the upper lid and bottom plate except when servicing it. . Adjust the temperature inside the rack within the range of the unit's operating temperature. (Refer to Section 1-3.) Specified Rack Mount Kit RMM-131 (Optional accessory) m . When mounting this unit into Sony LMS (Library Management System) VTR console, it is necessary to modify the VTR console. . When mounting this unit into Flexicart, be sure to use the specified kit below. VTR Mounting kit: BKFC-53/3 . The RMM-130 rack mount kit also can be used for the center position. 1-4 (E) Parts Packed in RMM-131 . Slide rails 2 . Rack angles (handles) with lock mechanism ... 2 . Rail brackets 4 . Plate nuts (large 4 . Plate nuts (small 4 . Screws (B4 x 8 8 . Hexagon socket head cap screws 8 . Flat washers 8 . Screws (RK5 x 14 2 . Ornamental washers 2 . L-shaped hexagon wrench 1 Rack Mounting Procedure . Removing the feet 1. Set the unit its side panel down. 2. Unscrew the four screws to remove the feet from the bottom plate of the unit. 3. Set the unit in a horizontal position. Feet PS4 x 20 Feet PS4 x 20 n Keep these screws and the feet. When operating the unit after demounting it from the rack, be sure to reattach the feet. Tightening torque: 98 x 10_2 N . m {10 kgf . cm} HDW-1800/D1800
-
 1
1 -
2
-
3
-
4
-
 5
5 -
 6
6 -
 7
7 -
 8
8 -
 9
9 -
 10
10 -
 11
11 -
 12
12 -
 13
13 -
 14
14 -
 15
15 -
16
-
17
-
18
-
19
-
20
-
21
-
22
-
23
-
24
-
25
-
26
-
27
-
28
-
29
-
30
-
31
-
32
-
33
-
34
-
35
-
36
-
37
-
38
 |
 |
