Sony HDW1800 Installation Manual - Page 28
Removing/Reattaching Plug-in, Board - hdw 1800 maintenance manual
 |
View all Sony HDW1800 manuals
Add to My Manuals
Save this manual to your list of manuals |
Page 28 highlights
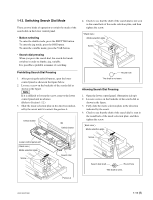
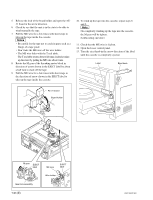
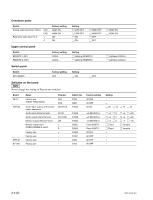
1-15-3. System Phase Alignment An external reference video signal must be input to this unit after it is adjusted so that SC-H conforms to the specifications. When Connecting to a Digital Switcher Fundamentally, the system phase adjustment is not necessary. Refer to the manual of the digital switcher for details. When Connecting to an Analog Switcher Perform the system phase adjustment according to the manual of the analog switcher. To adjust the system phase of this unit, use the MULTI CONTROL knob at the P03 : VID PROC page on the function menu. When adjusting (i.e. changing the settings), press the button below to blink the current setting value, and then turn the MULTI CONTROL knob. Button Item Display F3 SYSTEM SYNC PHASE SYNC PHS F4 SYSTEM SYNC PHASE (fine djustmen) SYNC FIN m . Be sure to adjust in PB mode. The system phase does not change even if the SYNC PHS/SYNC FIN is adjusted in the REC mode, but it changes when the REC mode is shifted to the PB mode. . The playback sound may be momentarily interrupted if the SYNC PHS/SYNC FIN is adjusted during tape playback. . The system phase of SD output can be adjusted in ITEM-719 and -720 of the extended setup menu. 1-16. Removing/Reattaching Plug-in Board m . Turn off the power and unplug the power cord before removing/reattaching the board. . When the plug-in board is replaced, refer to the mainte- nance manual, volume-1. Removing 1. Fully loosen the two fixing screws. 2. Remove the upper lid (rear) assembly by moving in the direction indicated by the arrow. Screw with stopper Upper lid (rear) assembly Screw with stopper 1-22 (E) HDW-1800/D1800
-
 1
1 -
2
-
3
-
4
-
5
-
6
-
7
-
8
-
9
-
10
-
11
-
12
-
13
-
14
-
15
-
16
-
17
-
18
-
19
-
20
-
21
-
22
-
 23
23 -
 24
24 -
 25
25 -
 26
26 -
 27
27 -
 28
28 -
 29
29 -
 30
30 -
 31
31 -
 32
32 -
 33
33 -
34
-
35
-
36
-
37
-
38
 |
 |
