Sony KLV-32U100M Operating Instructions - Page 13
Unit Controls and Connectors, Front, Top and Side Panel, Top and Side, Panel - no power
 |
View all Sony KLV-32U100M manuals
Add to My Manuals
Save this manual to your list of manuals |
Page 13 highlights
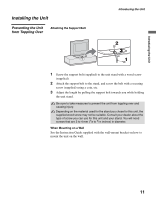
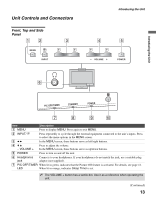
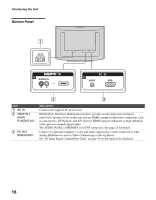
Unit Controls and Connectors Front, Top and Side Panel MENU INPUT Introducing the Unit VOLUME POWER Introducing the Unit PIC OFF/TIMER STANDBY POWER Item Description 1 MENU Press to display MENU. Press again to exit MENU. 2 INPUT/ Press repeatedly to cycle through the external equipment connected to the unit's inputs. Press to select the menu options in the MENU screen. 3 Bb In the MENU screen, these buttons serve as left/right buttons. 4 vV - VOLUME + Press to adjust the volume. In the MENU screen, these buttons serve as up/down buttons. 5 POWER Press to turn on and off the unit. 6 Headphones jack Connects to your headphones. If your headphones do not match the jack, use a suitable plug adaptor (not supplied). 7 PIC OFF/TIMER When lit in green, indicates that the Picture Off feature is activated. For details, see page 41. LED When lit in orange, indicates Sleep Timer is set. The VOLUME + button has a tactile dot. Use it as a reference when operating the unit. (Continued) 13
-
 1
1 -
2
-
3
-
4
-
5
-
6
-
7
-
 8
8 -
 9
9 -
 10
10 -
 11
11 -
 12
12 -
 13
13 -
 14
14 -
 15
15 -
 16
16 -
 17
17 -
 18
18 -
19
-
20
-
21
-
22
-
23
-
24
-
25
-
26
-
27
-
28
-
29
-
30
-
31
-
32
-
33
-
34
-
35
-
36
-
37
-
38
-
39
-
40
-
41
-
42
-
43
-
44
-
45
-
46
-
47
-
48
 |
 |
