Sony KLV-32U100M Operating Instructions - Page 28
Using the Unit, Button Descriptions - 32
 |
View all Sony KLV-32U100M manuals
Add to My Manuals
Save this manual to your list of manuals |
Page 28 highlights
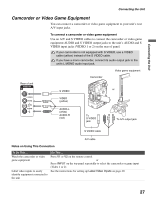
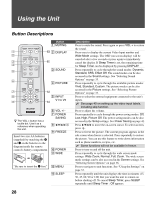
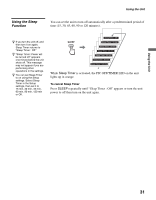
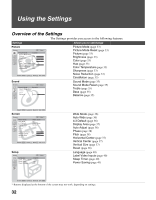
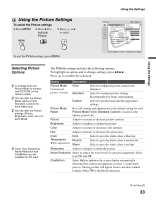
Using the Unit Button Descriptions MUTING DISPLAY POWER MODE SOUND PICTURE WIDE Button 1 MUTING 2 DISPLAY INPUT V1 V2 V3 V4 V5 3 SOUND VOL POWER SAVING MENU FREEZE SLEEP 4 PICTURE 5 INPUT V1 to V5 z The VOL + button has a tactile dot. Use it as a reference when operating the unit. Insert two size AA batteries (supplied) by matching the e and E on the batteries to the diagram inside the remote control's battery compartment. 6 VOL +/- 7 POWER SAVING 8 V/v/B/b/ 9 FREEZE 0 POWER qa WIDE "Be sure to insert the E first." qs MENU qd SLEEP 28 Description Press to mute the sound. Press again or press VOL + to restore the sound. Press once to display the current Video Input number and Wide Mode settings. The OSD (on screen display) will be canceled after a few seconds or press again to immediately cancel the display. If Sleep Timer is set, the remaining time for Sleep Timer can be displayed by pressing DISPLAY. Press repeatedly to cycle through the sound modes: Dynamic, Standard, SRS, Effect Off. The sound modes can be also accessed in the Sound settings. See "Selecting Sound Options" on page 35. Press repeatedly to cycle through the available picture modes: Vivid, Standard, Custom. The picture modes can be also accessed in the Picture settings. See "Selecting Picture Options" on page 33. Press to select the external equipment connected to the unit's inputs. See page 40 on setting up the video input labels, including skip function. Press to adjust the volume. Press repeatedly to cycle through the power saving modes: Off, Low, High, Picture Off. The power saving modes can be also accessed in the Setup settings. See Power Saving on page 41. Press V/v/B/b to move the on-screen cursor. To select an item, press . Press to freeze the picture. The current program appears in the sub screen when freeze is selected. Press repeatedly to restore the picture. You can use this feature to write down information such as phone numbers, recipes, etc. Some functions will not be available in freeze. Press to turn on and off the unit. Press repeatedly to cycle through the wide screen mode settings: Wide Zoom, Normal, Full, Zoom. The wide screen mode settings can be also accessed in the Screen settings. See "Selecting Screen Options" on page 36. Press to navigate to unit functions. See "Using the Settings" on page 32. Press repeatedly until the unit displays the time in minutes (15, 30, 45, 60, 90 or 120) that you want the unit to remain on before shutting off. To cancel Sleep Timer, press SLEEP repeatedly until Sleep Timer : Off appears.
-
 1
1 -
2
-
3
-
4
-
5
-
6
-
7
-
8
-
9
-
10
-
11
-
12
-
13
-
14
-
15
-
16
-
17
-
18
-
19
-
20
-
21
-
22
-
 23
23 -
 24
24 -
 25
25 -
 26
26 -
 27
27 -
 28
28 -
 29
29 -
 30
30 -
 31
31 -
 32
32 -
 33
33 -
34
-
35
-
36
-
37
-
38
-
39
-
40
-
41
-
42
-
43
-
44
-
45
-
46
-
47
-
48
 |
 |
