Sony LBT-DJ2i Operating Instructions - Page 14
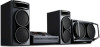
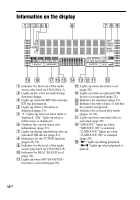
CD-LIGHT SYNC OUT jack DSYSTEM CONTROL jack EFRONT SPEAKER terminals FVOLTAGE SELECTOR GPower - instructions
 |
UPC - 024272736948
View all Sony LBT-DJ2i manuals
Add to My Manuals
Save this manual to your list of manuals |
Page 14 highlights
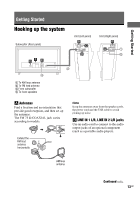
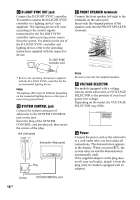
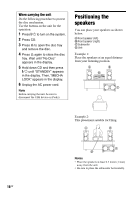
C D-LIGHT SYNC OUT jack Connect the D-LIGHT SYNC controller. You need to connect the D-LIGHT SYNC controller to a lighting device* (not supplied). The lighting device will react according to the control signals transmitted by the D-LIGHT SYNC controller upon receiving music source from the system. For details on the use of the D-LIGHT SYNC controller and lighting device, refer to the operating instructions supplied with the respective device. D-LIGHT SYNC controller cord E FRONT SPEAKER terminals Connect the front speaker left/right to the terminals on the subwoofer. Insert only the stripped portion of the speaker cords into the FRONT SPEAKER terminals. RL FRONT SPEAKER * Refer to the operating instructions supplied with the D-LIGHT SYNC controller for the recommended lighting device. Note The lighting effect may be different depending on the connected lighting device or the type of music being played back. D SYSTEM CONTROL jack Connect the system connector of subwoofer to the SYSTEM CONTROL jack on the unit. Insert the plug of the SYSTEM CONTROL cord into the jack, then secure the screws of the plug. Unit (Left panel) Subwoofer (Rear panel) Plug Screws 14GB SYSTEM CONTROL cord Note Be sure to use only the supplied speakers. F VOLTAGE SELECTOR For models equipped with a voltage selector on the subwoofer, set VOLTAGE SELECTOR to the position of your local power line voltage. Depending on the model, the VOLTAGE SELECTOR may differ. VOLTAGE SELECTOR 120V 220V 230240V G Power Connect the power cord on the subwoofer to a wall outlet after you have make all connections. The demonstration appears in the display. When you press "/1, the system turns on and the demonstration automatically ends. If the supplied adaptor on the plug does not fit your wall outlet, detach it from the plug (only for models equipped with an adaptor).
-
 1
1 -
2
-
3
-
4
-
5
-
6
-
7
-
8
-
 9
9 -
 10
10 -
 11
11 -
 12
12 -
 13
13 -
 14
14 -
 15
15 -
 16
16 -
 17
17 -
 18
18 -
 19
19 -
20
-
21
-
22
-
23
-
24
-
25
-
26
-
27
-
28
-
29
-
30
-
31
-
32
-
33
-
34
-
35
-
36
-
37
-
38
-
39
-
40
-
41
-
42
-
43
-
44
-
45
-
46
-
47
-
48
-
49
-
50
-
51
-
52
-
53
-
54
-
55
-
56
 |
 |
