Sony MDSJE320 Service Manual - Page 13
Test Mode - service manual
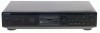 |
UPC - 027242541344
View all Sony MDSJE320 manuals
Add to My Manuals
Save this manual to your list of manuals |
Page 13 highlights
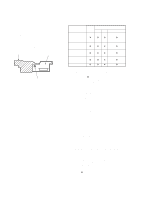
SECTION 4 TEST MODE 4-1. PRECAUTIONS FOR USE OF TEST MODE 1 As loading related operations will be performed regardless of the test mode operations being performed, be sure to check that the disc is stopped before setting and removing it. Even if the §EJECT button is pressed while the disc is rotating during continuous playback, continuous recording, etc., the disc will not stop rotating. Therefore, it will be ejected while rotating. Be sure to press the §EJECT button after pressing the EDIT/NO button and the rotation of disc is stopped. 2 The erasing-protection tab is not detected in the test mode. Therefore, operating in the recording laser emission mode and pressing the rREC button, the recorded contents will be erased regardless of the position of the tab. When using a disc that is not to be erased in the test mode, be careful not to enter the continuous recording mode and traverse adjustment mode. 4-1-1. Recording laser emission mode and operating buttons 1. Continuous recording mode (CREC MODE) 2. Traverse adjustment mode (EFBAL ADJUST) 3. Laser power adjustment mode (LDPWR ADJUST) 4. Laser power check mode (LDPWR CHECK) 5. When pressing the rREC button. 4-2. SETTING THE TEST MODE While pressing the AMS knob, insert the power plug into the power supply outlet, and release the AMS knob. 4-3. EXITING THE TEST MODE When the 1/u button is pressed, it becomes in the STANDBY mode. Or unplug the power plug from an outlet. 4-4. BASIC OPERATIONS OF THE TEST MODE All operations are performed using the AMS knob, YES button, and EDIT/NO button. The functions of these buttons are as follows. Function name Function AMS knob Changes parameters and modes YES button Proceeds onto the next step. Finalizes input. EDIT/NO button Returns to previous step. Stops operations. 4-5. SELECTING THE TEST MODE Thirteen test modes are selected by turning the AMS knob. Display TEMP ADJUST LDPWR ADJUST LDPWR CHECK EFBAL ADJUST FBIAS ADJUST FBIAS CHECK CPLAY MODE CREC MODE DETRK CHECK S curve CHECK EEP MODE MANUAL CMD SVDATA READ Contents Temperature compensation offset adjustment Laser power adjustment Laser power check Traverse adjustment Focus bias adjustment Focus bias check Continuous playback mode Continuous recording mode Detrack check S curve check ∗ Non-volatile memory mode ∗ Manual command transfer mode ∗ Data reading out mode ∗ For detailed description of each adjustment mode, refer to "5. Electrical Adjustments". If a different adjustment mode has been selected by mistake, press the EDIT/NO button to exit from this mode. * The EEP MODE, S curve CHECK, MANUAL CMD and SVDATA READ are not used in servicing. If set accidentally, press the EDIT/NO button immediately to exit this mode. - 13 -
-
 1
1 -
2
-
3
-
4
-
5
-
6
-
7
-
 8
8 -
 9
9 -
 10
10 -
 11
11 -
 12
12 -
 13
13 -
 14
14 -
 15
15 -
 16
16 -
 17
17 -
 18
18 -
19
-
20
-
21
-
22
-
23
-
24
-
25
-
26
-
27
-
28
-
29
-
30
-
31
-
32
-
33
-
34
-
35
-
36
-
37
-
38
-
39
-
40
-
41
-
42
-
43
-
44
-
45
-
46
-
47
-
48
-
49
-
50
-
51
-
52
-
53
-
54
-
55
-
56
 |
 |
