Sony MEX-N4100BT Operating Instructions - Page 35
N5100BT only, Subwoofer Easy Connection
 |
View all Sony MEX-N4100BT manuals
Add to My Manuals
Save this manual to your list of manuals |
Page 35 highlights
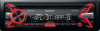
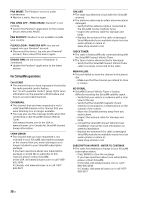
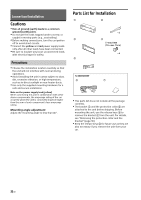
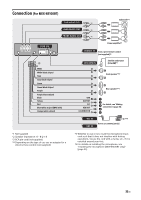
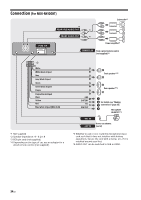
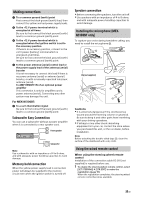
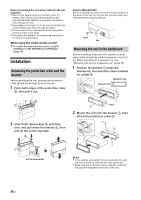
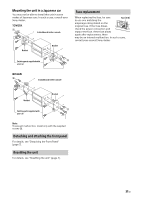
Making connections To a common ground (earth) point First connect the black ground (earth) lead, then connect the yellow and red power supply leads. To the +12 V power terminal which is energized at all times Be sure to first connect the black ground (earth) lead to a common ground (earth) point. To the +12 V power terminal which is energized when the ignition switch is set to the accessory position If there is no accessory position, connect to the +12 V power (battery) terminal which is energized at all times. Be sure to first connect the black ground (earth) lead to a common ground (earth) point. To the power antenna (aerial) control lead or the power supply lead of the antenna (aerial) booster It is not necessary to connect this lead if there is no power antenna (aerial) or antenna (aerial) booster, or with a manually-operated telescopic antenna (aerial). To AMP REMOTE IN of an optional power amplifier This connection is only for amplifiers and a power antenna (aerial). Connecting any other system may damage the unit. For MEX-N5100BT: To a car's illumination signal Be sure to first connect the black ground (earth) lead to a common ground (earth) point. Subwoofer Easy Connection You can use a subwoofer without a power amplifier when it is connected to a rear speaker cord. Front speaker Subwoofer Note Use a subwoofer with an impedance of 4 to 8 ohms, and with adequate power handling capacities to avoid damage. Memory hold connection When the yellow power supply lead is connected, power will always be supplied to the memory circuit even when the ignition switch is turned off. Speaker connection Before connecting the speakers, turn the unit off. Use speakers with an impedance of 4 to 8 ohms, and with adequate power handling capacities to avoid damage. Installing the microphone (MEXN5100BT only) To capture your voice during handsfree calling, you need to install the microphone . Clip (not supplied) Cautions It is extremely dangerous if the cord becomes wound around the steering column or gearstick. Be sure to keep it and other parts from interfering with your driving operations. If airbags or any other shock-absorbing equipment is in your car, contact the store where you purchased this unit, or the car dealer, before installation. Note Before attaching the double-sided tape , clean the surface of the dashboard with a dry cloth. Using the wired remote control When using the steering wheel remote control Installation of the connection cable RC-SR1 (not supplied) is required before use. 1 To enable the steering wheel remote control, select [SET STEERING] [STR EDIT] to make the registration (page 19). When the registration completes, the steering wheel remote control becomes available. 35GB
-
 1
1 -
2
-
3
-
4
-
5
-
6
-
7
-
8
-
9
-
10
-
11
-
12
-
13
-
14
-
15
-
16
-
17
-
18
-
19
-
20
-
21
-
22
-
23
-
24
-
25
-
26
-
27
-
28
-
29
-
 30
30 -
 31
31 -
 32
32 -
 33
33 -
 34
34 -
 35
35 -
 36
36 -
 37
37 -
 38
38 -
 39
39 -
 40
40 -
41
-
42
-
43
-
44
-
45
-
46
-
47
-
48
-
49
-
50
-
51
-
52
-
53
-
54
-
55
-
56
-
57
-
58
-
59
-
60
-
61
-
62
-
63
-
64
-
65
-
66
-
67
-
68
-
69
-
70
-
71
-
72
-
73
-
74
-
75
-
76
-
77
-
78
-
79
-
80
-
81
-
82
-
83
-
84
-
85
-
86
-
87
-
88
-
89
-
90
-
91
-
92
-
93
-
94
-
95
-
96
-
97
-
98
-
99
-
100
-
101
-
102
-
103
-
104
-
105
-
106
-
107
-
108
-
109
-
110
-
111
-
112
-
113
-
114
-
115
-
116
-
117
-
118
-
119
-
120
 |
 |