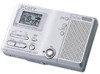
Sony MZ-B10 Operating Instructions (primary manual) - Page 10
Back of the recorder, The MIC PLUG IN POWER jack
 |
View all Sony MZ-B10 manuals
Add to My Manuals
Save this manual to your list of manuals |
Page 10 highlights
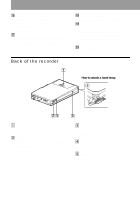
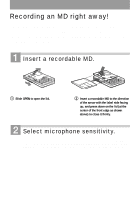
P MIC (PLUG IN POWER) jack (19) Connect an optional stereo microphone to this jack to record. The MIC (PLUG IN POWER) jack has a tactile dot. Q LINE IN (OPTICAL) jack (21) (22) Connect an optional optical or line cable to this jack to record from a CD, etc. R VOL control (16) The VOL control has a tactile dot. S HOLD switch (12) Slide the switch in the direction of the arrow to disable the buttons on the recorder. To prevent the buttons from being accidentally operated when you carry the recorder, use this function. T OPEN switch (13) (16) Back of the recorder 1 How to attach a hand strap 5 23 4 A Battery compartment (12) Insert two alkaline dry batteries (size AA) here. B ERASE button (31) (37) During playback, press this button to erase the track. C ALL ERASE button (31) Press ERASE while pressing this button to erase the contents of an entire disc. D DC IN 3V jack (43) When you connect an optional AC power adaptor, connect it to this jack. E Handstrap hole 10
-
 1
1 -
2
-
3
-
4
-
 5
5 -
 6
6 -
 7
7 -
 8
8 -
 9
9 -
 10
10 -
 11
11 -
 12
12 -
 13
13 -
 14
14 -
 15
15 -
16
-
17
-
18
-
19
-
20
-
21
-
22
-
23
-
24
-
25
-
26
-
27
-
28
-
29
-
30
-
31
-
32
-
33
-
34
-
35
-
36
-
37
-
38
-
39
-
40
-
41
-
42
-
43
-
44
-
45
-
46
-
47
-
48
-
49
-
50
-
51
-
52
-
53
-
54
-
55
-
56
-
57
-
58
-
59
-
60
 |
 |
