Sony MZ-B10 Operating Instructions (primary manual) - Page 9
Looking at the controls - review
 |
View all Sony MZ-B10 manuals
Add to My Manuals
Save this manual to your list of manuals |
Page 9 highlights
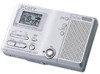
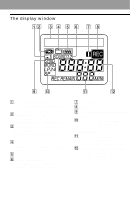
Looking at the controls See pages in ( ) for more details. Front of the recorder 1 234 5 qa qsqd qf Recorder Operation 6 789 q; A Display window (23) (26) (30) (34) B MENU/ENTER button (23) (26) (30) (34) (38) You can use various settings using menu items. C SPEED CONTROL +, - button (26) Use this button to increase or decrease the playback speed. D Built-in microphone (14) E Speakers (16) F REC MODE button (14) (18) Use this button to select 2 times normal (LP2 or monaural) or 4 times (LP4) the normal (SP) recording time. G GROUP button (32) This button is used when cueing to a group or erasing a group. H x • STOP button (14) (16) (23) (30) (38) qg qhqjqk ql w; I N • PLAY (play) button (15) (16) The N • PLAY button has a tactile dot. J REC button (14) (18) (32) K . • REVIEW • AMS, > • CUE • AMS (search /AMS) buttons (15) (17) (23) (26) (29) (33) (38) L TRACK MARK button (29) Use this button to add track marks automatically or to divide a track into separate tracks. M X • PAUSE button (15) (17) (29) N REC indicator (14) (15) Lights up while recording. O i (headphones/earphones) jack (14) (16) Connect headphones or earphones to this jack. 9
-
 1
1 -
2
-
3
-
 4
4 -
 5
5 -
 6
6 -
 7
7 -
 8
8 -
 9
9 -
 10
10 -
 11
11 -
 12
12 -
 13
13 -
 14
14 -
15
-
16
-
17
-
18
-
19
-
20
-
21
-
22
-
23
-
24
-
25
-
26
-
27
-
28
-
29
-
30
-
31
-
32
-
33
-
34
-
35
-
36
-
37
-
38
-
39
-
40
-
41
-
42
-
43
-
44
-
45
-
46
-
47
-
48
-
49
-
50
-
51
-
52
-
53
-
54
-
55
-
56
-
57
-
58
-
59
-
60
 |
 |
