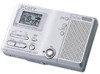
Sony MZ-B10 Operating Instructions (primary manual) - Page 19
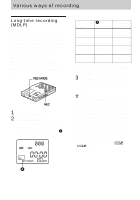
Recording from a stereo microphone, To MIC PLUG IN, POWER, Stereo, microphone, not supplied, REC MODE - mdlp
 |
View all Sony MZ-B10 manuals
Add to My Manuals
Save this manual to your list of manuals |
Page 19 highlights
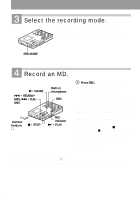
Notes • It is recommended that you use the AC power adaptor (not supplied) for long recordings. • During monaural recording of a stereo sound source connected through the digital (optical) input jack, you can still monitor the recorded sound in stereo by using headphones/ earphones connected to the i jack. • When you record in LP4 mode, momentary noise may be produced on very rare occasions with certain sound sources. This is because of the special digital audio compression technology that enables a recording time 4 times longer than normal. If noise is produced, it is recommended that you record in SP or LP2 mode to obtain better sound quality. Recording from a stereo microphone Connect a stereo microphone (ECM-719, etc.) to the MIC (PLUG IN POWER) jack. The recorder input automatically switches to the externally connected microphone input. Stereo microphone (not supplied) REC MODE To MIC (PLUG IN REC POWER) 1 Insert a recordable disc and select the microphone sensitivity. See "To select microphone sensitivity" (page 39). 2 Press REC MODE repeatedly until "SP", "LP2", "LP4", or "MONO" lights up in the display. For details on the recording mode, see "Long-time recording (MDLP)" (page 18). 3 Press REC. For other operations on recording, see "Recording an MD right away!" (page 13). z When using a plug-in power-type microphone, the microphone can be operated even when its power switch is turned off since power is supplied from the recorder itself. If you are using the optional stereo microphone ECM-719, set the power switch on the microphone to OFF to allow the recorder to provide power to the microphone. It is recommended that you set the switch on the microphone to OFF during use. Notes • You cannot record through the externally connected microphone while an optical cable is connected to the LINE IN (OPTICAL) jack. The recorder automatically selects the recorder input in the following order of priority; optical input, externally connected microphone input, analog (line) input, and built-in microphones input. • The microphone may pick up the operating sound of the recorder itself (such as the sound of the motor). Use the microphone away from the recorder in such cases. Please note that the sound of recorder operations may be picked up if the microphone that you use has a short connector. 19
-
 1
1 -
2
-
3
-
4
-
5
-
6
-
7
-
8
-
9
-
10
-
11
-
12
-
13
-
 14
14 -
 15
15 -
 16
16 -
 17
17 -
 18
18 -
 19
19 -
 20
20 -
 21
21 -
 22
22 -
 23
23 -
 24
24 -
25
-
26
-
27
-
28
-
29
-
30
-
31
-
32
-
33
-
34
-
35
-
36
-
37
-
38
-
39
-
40
-
41
-
42
-
43
-
44
-
45
-
46
-
47
-
48
-
49
-
50
-
51
-
52
-
53
-
54
-
55
-
56
-
57
-
58
-
59
-
60
 |
 |
