Sony MZ-B10 Operating Instructions (primary manual) - Page 15
Remove the MD, To know the recording, condition - part manual
 |
View all Sony MZ-B10 manuals
Add to My Manuals
Save this manual to your list of manuals |
Page 15 highlights
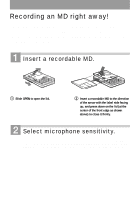
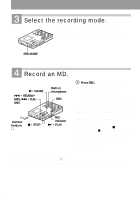
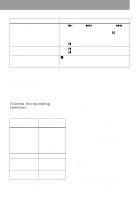
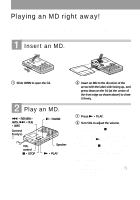
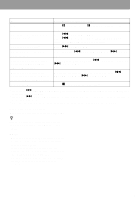
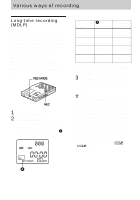
To Record partway through the previous recording Pause1) Remove the MD Operation Press N • PLAY, > • CUE • AMS or . • REVIEW • AMS to find the beginning of the material to be recorded, and then press X • PAUSE. Press REC so that the recorder changes to recording pause. Press X • PAUSE again to start recording. Press X • PAUSE while recording. Press X • PAUSE again to resume recording. x • STOP to stop recording, check if "TOC Edit" has disappeared from the display, and then open the lid. 1) The REC indicator flashes during recording pause. Track marks are not added while recording with microphone, even when the recorder is paused. If the recording does not start • Make sure the recorder is not locked (page 12). • Make sure the MD is not record-protected (page 46). • Premastered MDs cannot be recorded over. To know the recording condition The REC indicator lights up or flashes according to the recording condition. Recording condition While recording Recording standby Less than 3 minutes' recording time available A track mark has been added1) REC indicator lights up flashes according to the loudness of the source while recording with a microphone (voice mirror) flashes flashes slowly goes off momentarily 1) Except when track marking was done manually or automatically using Auto Time Mark (page 24). Notes • For long recordings, it is recommended that you power the recorder from a house current using an optional AC power adaptor ACE30HG (page 43). • The lid will not open during recording or until "TOC Edit" disappears from the display after the recording has completed. • If the power supply is disrupted (i.e. the batteries are removed or becomes exhausted or the optional AC power adaptor is disconnected) during a recording operation, or while "TOC Edit" appears in the display, then it will not be possible to open the lid until power is restored. • "Data Save" or "TOC Edit" flashes while data of the recording (the track's start and end points, etc.) is being recorded. Do not move or jog the recorder or disconnect the power source while the indication is flashing in the display. If you do, the material recorded up to that point will not be saved to the disc. • When you record through the microphone, the various sounds made by the recorder may also be recorded. • The built-in microphone do not operate whenever an optional microphone is connected into the MIC (PLUG IN POWER) jack on the recorder. • The built-in microphone do not operate whenever an optical cable or a line cable (not supplied) is connected into the LINE IN (OPTICAL) jack on the recorder. 15
-
 1
1 -
2
-
3
-
4
-
5
-
6
-
7
-
8
-
9
-
 10
10 -
 11
11 -
 12
12 -
 13
13 -
 14
14 -
 15
15 -
 16
16 -
 17
17 -
 18
18 -
 19
19 -
 20
20 -
21
-
22
-
23
-
24
-
25
-
26
-
27
-
28
-
29
-
30
-
31
-
32
-
33
-
34
-
35
-
36
-
37
-
38
-
39
-
40
-
41
-
42
-
43
-
44
-
45
-
46
-
47
-
48
-
49
-
50
-
51
-
52
-
53
-
54
-
55
-
56
-
57
-
58
-
59
-
60
 |
 |
