Sony PRS950BC Creating PDFs User Guide - Page 37
Creating a linked Table of Contents in Acrobat
 |
View all Sony PRS950BC manuals
Add to My Manuals
Save this manual to your list of manuals |
Page 37 highlights
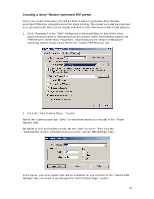
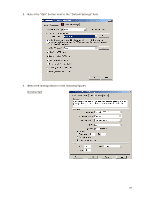
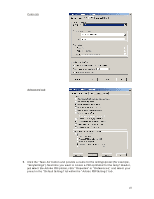
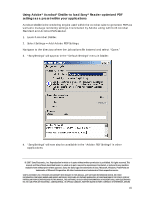
Creating a linked Table of Contents in Acrobat 1. Open the PDF in Adobe® Acrobat® Standard or Adobe Acrobat Professional. 2. Open Tools Œ Advanced Editing Œ Link Tool. 3. Using the Link Tool, draw a rectangle around the text to be linked. 4. Releasing the cursor after drawing the rectangle will launch the "Create Link" dialog. Apply the settings shown below. Be sure that "Go to a page view" is selected. Click "Next" to bring up the "Create Go To View" dialog. 5. DO NOT select "Set Link" immediately. Instead, scroll to the page that you want the link to navigate to when it is clicked in your PDF. (You can also use View Œ Go To Œ Page and enter the page number to go directly to that page.) 6. Click "Set Link" to complete the link. 37
-
 1
1 -
2
-
3
-
4
-
5
-
6
-
7
-
8
-
9
-
10
-
11
-
12
-
13
-
14
-
15
-
16
-
17
-
18
-
19
-
20
-
21
-
22
-
23
-
24
-
25
-
26
-
27
-
28
-
29
-
30
-
31
-
 32
32 -
 33
33 -
 34
34 -
 35
35 -
 36
36 -
 37
37 -
 38
38 -
 39
39 -
 40
40 -
 41
41 -
 42
42 -
43
 |
 |

37
Creating a linked Table of Contents in Acrobat
1.
Open the PDF in Adobe
®
Acrobat
®
Standard or Adobe Acrobat Professional.
2. Open Tools
Advanced Editing
Link Tool.
3.
Using the Link Tool, draw a rectangle around the text to be linked.
4.
Releasing the cursor after drawing the rectangle will launch the “Create Link” dialog.
Apply the settings shown below. Be sure that “Go to a page view” is selected.
Click “Next” to bring up the “Create Go To View” dialog.
5.
DO NOT select “Set Link” immediately. Instead, scroll to the page that you want the
link to navigate to when it is clicked in your PDF. (You can also use View
Go To
Page and enter the page number to go directly to that page.)
6.
Click “Set Link” to complete the link.