Sony STR-GX90ES Operating Instructions / Mode d’emploi - Page 23
Editing, AUDIO
 |
View all Sony STR-GX90ES manuals
Add to My Manuals
Save this manual to your list of manuals |
Page 23 highlights
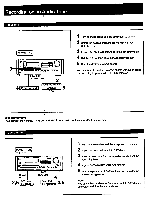
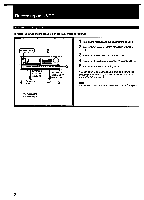
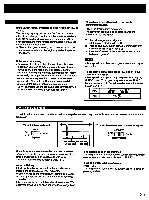
ideo Tape Editing (POWER ON 0 IM MUM • MI I DO =Dom= • 000 • 41 to VIDEO 1, 2 or 3 t--1 to VIDEO 1 or 2 `AUDIO VIDEO IN/AUDIO IN VIDEO OUT/ OUT 4 Playback-side VCR 'recording side VCR' 5 (for playback) 1 Turn on the receiver and the equipment to be used. 2 Select the playback side VCR with the FUNCTION selectors so that VIDEO MONITOR indicator of the program source to be recorded lights up. 3 Select VIDEO with REC OUT SELECTOR. 4 Set the recording side VCR to the recording mode. 5 Set the playback side VCR to the playback mode. You can listen to another program source during video tape editing by selecting FUNCTION selectors. nth. Audio signals Video signals dding New Sound on a Video Tape during Editing uring video tape editing, you can replace the sound previously recorded on a video tape with sound from another audio )urce, thus making your own personalized video tape. POWER ON 6 VCR 1 or 2 Playback-side VCRI 3,46 co 411) • etee• 0 • • Monitor TV Turntable system CD player Tape deck DAT deck 1 Turn on the receiver and the equipment to be used. 2 Select the playback side VCR with the FUNCTION selectors so that the indicator of the program source to be recorded lights up. 3 Insert a recorded tape into the playback side VCR and set it in the playback mode. 4 At the point where audio dubbing is to start, press the pause button on the playback side VCR. 5 Select the audio program source with REC OUT SELECTOR. 6 Release the pause mode of the playback side VCR and set the recording side VCR to the recording mode. 7 Start playing the selected program source. wk. Audio signals 4=., Video signals 23
-
 1
1 -
2
-
3
-
4
-
5
-
6
-
7
-
8
-
9
-
10
-
11
-
12
-
13
-
14
-
15
-
16
-
17
-
 18
18 -
 19
19 -
 20
20 -
 21
21 -
 22
22 -
 23
23 -
 24
24 -
 25
25 -
 26
26 -
 27
27 -
 28
28 -
29
-
30
-
31
-
32
-
33
-
34
-
35
-
36
-
37
-
38
-
39
-
40
-
41
-
42
-
43
-
44
-
45
-
46
-
47
-
48
-
49
-
50
-
51
-
52
-
53
-
54
-
55
-
56
-
57
-
58
 |
 |
