Sony STR-ZA2100ES Installation Guide - Page 9
Mounting the receiver using the rack mount kit, Remove screws from the right side of
 |
View all Sony STR-ZA2100ES manuals
Add to My Manuals
Save this manual to your list of manuals |
Page 9 highlights
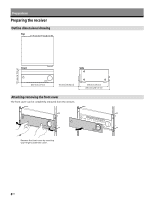
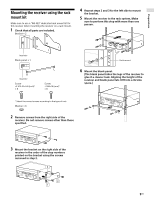
Preparations Mounting the receiver using the rack mount kit Make sure to use a "WS-RE1" dedicated rack mount kit for this receiver when mounting the receiver on a rack mount. 1 Check that all parts are included. Bracket × 2 4 Repeat steps 2 and 3 for the left side to mount the bracket. 5 Mount the receiver to the rack system. Make sure to perform this step with more than one person. Insulator Blank panel × 1 Insulator Screw +P U10-32×3/4 (inch)* × 6 Screw +T M5×18 (mm)* × 6 Rack mount 6 Mount the blank panel. (The blank panel hides the legs of the receiver to give it a cleaner look. Aligning the height of the receiver and blank panel lets it fit into a 4U size space.) * Select the correct screws according to the type of rack. Washer × 6 2 Remove screws from the right side of the receiver. Do not remove screws other than those specified. 3 Mount the bracket on the right side of the receiver in the order of the step numbers printed on the bracket using the screws removed in step 2. 9US
-
 1
1 -
2
-
3
-
 4
4 -
 5
5 -
 6
6 -
 7
7 -
 8
8 -
 9
9 -
 10
10 -
 11
11 -
 12
12 -
 13
13 -
 14
14 -
15
-
16
-
17
-
18
-
19
-
20
-
21
-
22
-
23
-
24
-
25
-
26
-
27
-
28
-
29
-
30
-
31
-
32
-
33
-
34
-
35
-
36
-
37
-
38
-
39
-
40
-
41
-
42
-
43
-
44
-
45
-
46
-
47
-
48
-
49
-
50
-
51
-
52
-
53
-
54
-
55
-
56
-
57
-
58
-
59
-
60
-
61
-
62
-
63
-
64
-
65
-
66
-
67
-
68
-
69
-
70
-
71
-
72
-
73
-
74
-
75
-
76
-
77
 |
 |
