Stihl FS 88 Instruction Manual
Stihl FS 88 Manual
 |
View all Stihl FS 88 manuals
Add to My Manuals
Save this manual to your list of manuals |
Stihl FS 88 manual content summary:
- Stihl FS 88 | Instruction Manual - Page 1
STIHL FS BB, 7DB Instruction Manual Owner's Manual Assembling Safety Precautions Operating Instructions Maintenance - Stihl FS 88 | Instruction Manual - Page 2
30-2 - STIHL Autocut 24-2 - STIHL Polymatic 30-2 - STIHL Polycut 40-3 - STIHL Fixed Line Head - Grass Cutting Blade 230 - Brush Knife 250 - Circular Saw Blade 200 Fuel Fueling Fitting the Harness Starting 2 Adjusting Carburetor 4 Operating Instructions Checking Spark Plug 4 Cleaning Air Filter - Stihl FS 88 | Instruction Manual - Page 3
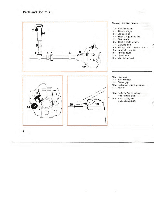
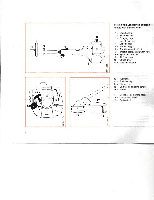
Throttle cable retainer 7 = Carrying loop 8 = Throttle cable / stop switch wire 9 = Spark plug terminal 10 = Air filter cover 11 = Choke lever = 12 Machine support 13 = Fuel tank 14 = Fuel filler cap 15 = Starter grip 16 = Carburetor adjusting screws 17 = Muffler 18 = Deflector (for all cutting - Stihl FS 88 | Instruction Manual - Page 4
to the ignition wire. 10. Air filter cover. Covers the air filter element. 11. Choke lever. Eases engine starting by enriching mixture. 4. . 12. Machine support. For resting machine on the ground. 13. Fuel tank. For fuel and oil mixture. 14. Fuel filler cap. For closing the fuel tank. 15. Starter - Stihl FS 88 | Instruction Manual - Page 5
= 5 Throttle trigger 6 = Throttle trigger interlock 7 = Throttle cable / stop switch wire 8 = Spark plug terminal 9 = Air filter cover 10= Choke lever = 11 Machine support 12 = Fuel tank 13 = Fuel filler cap 14 = Starter grip 15 = Carburetor adjusting screws 16 = Muffler 17 = Deflector (for - Stihl FS 88 | Instruction Manual - Page 6
harness. 8. Spark plug terminal. Connects the spark plug to the ignition wire. 9. Air filter cover. Covers the air filter element. 10. Choke lever. Eases engine starting by enriching mixture. 11. Machine support. For resting machine on the ground. 4. Slide control. Starting throttle lock and stop - Stihl FS 88 | Instruction Manual - Page 7
and obseNe the following safety precautions and warnings. Read the owner's manual and the safety instructions periodically. Careless or improper use of any brushcutter may cause serious or fatal injury. Have your STIHL dealer show you how to operate your brushcutter. ObseNe all applicable local - Stihl FS 88 | Instruction Manual - Page 8
applicable national standard). To reduce the risk of injury to your face STIHL recommends that you also wear a face shield or face screen over your long hair or anything that could become caught on branches, brush Of- moving parts of the unit. Wear long' pants made of heavy material to protect your - Stihl FS 88 | Instruction Manual - Page 9
condition. Inspect for loose parts (nuts, screws, etc.) and for cracked, bent, warped or damaged blades. Fueling Your STIHL brushcutter uses an oilgasoline mixture for fuel (see the chapter on "Fuel" of your owner's manual). Warning! Gasoline is an extremely flammable fuel. Ir spilled or ignited - Stihl FS 88 | Instruction Manual - Page 10
Fueling Instructions Fuel your brushcutter in well-ventilated areas, outdoors. rntng l Gasoline vapor pressure may build up inside the gas tank of a two cycle engine depending on the fuel used, the weather condition, and the venting system of the tank. In order to reduce th risk of personal injury - Stihl FS 88 | Instruction Manual - Page 11
deflector. Keep the skirt on the deflectors adjusted properly I at all times (see chapter on mounting the ~ various cutting tools of your owner's manual). Do not overreach. Keep proper footing and balance at all times. Warningl Never attempt to operate any brush cutter with one hand. Loss of - Stihl FS 88 | Instruction Manual - Page 12
throttle lock as you do not have control of the engine speed. See section of your owner's manual on the proper use of the slide control. If the should be replaced. Never use unauthorized parts to secure the blade. If the blade continues to loosen, see your STIHL dealer. Never use a brushculler with - Stihl FS 88 | Instruction Manual - Page 13
USING THE CUTTING TOOLS For an illustration of the various cutting tools and instructions on proper mounting see the chapter on "mounting the cutting tools" in your owner's manual. Using the mowing heads The STIHL Supercut, Autocut, Polymatic and Polycut mowing heads produce a clean and tidy finish - Stihl FS 88 | Instruction Manual - Page 14
" mowing head Frayed line is replaced by a simple adjustment (see instruction sheet supplied with mowing head). STIHL "Autocut" mowing head Nylon cutting cord advances automatically when tapped against the ground. STIHL "Polycut" mowing head Important! Three rectangular wear limit marks are applied - Stihl FS 88 | Instruction Manual - Page 15
a brush knife may cause it to crack, chip or shatter. Thrown parts may seriously injure the operator or bystanders. To reduce the risk of side of the blade to avoid "kickout" situations (see appropriate section in this manual). Do not attempt to cut woody material with a larger diameter, since the - Stihl FS 88 | Instruction Manual - Page 16
STIHL recommends that the standard deflector be removed and replaced by the special "stop" (see chapter "circular saw blade" for mounting instructions Before starting the cut, accelerate the engine up to full throttle. Perform cut with uniform pressure. STIHL recommends that the circular saw blade be - Stihl FS 88 | Instruction Manual - Page 17
, REPAIR AND STORING Use only identical STIHL replacement parts for maintenance and repair. Use of parts manufactured by others may cause serious or fatal injury. Follow the maintenance and repair instructions in the appropriate section of your owner's manual. Please refer to the maintenance chart - Stihl FS 88 | Instruction Manual - Page 18
your STIHL dealer. Do not attach any blade to a unit without proper installation of all required parts. Never use unauthorized parts to secure the blade. Failure to use the proper parts may longer than a few days, always empty the fuel tank. Warnlngl Keep hands and feet away from cUlling tool. 17 - Stihl FS 88 | Instruction Manual - Page 19
20-1 mowing head (FS 74 only) 2 STIHL Supercut 20-2 mowing head 3 STIHL Autocut 20-2 mowing head (FS 74 only) 4 STIHL Autocut 24-2 mowing head 5 STIHL Autocut 25-2 mowing head 6 STIHL Autocut 30-2 mowing head 7 STIHL Polymatic 30-2 mowing head 8 STIHL Polycut 20-3 mowing head 9 STIHL Fixed Line head - Stihl FS 88 | Instruction Manual - Page 20
Cutting tools Deflectors ~---' 3 5 7 t-J 9 2 15 4~ ~- 6 16 8 ~l - (e' 'C( ~..... 10 11 . ) -:~ 1 -- \ 18 --..../J 12 A 19 13 14 0 (:) ~ Handles Carrying straps 0 20~ ~ 21 22 24 V 23 25 ~ 21 22 V 23 ...." 25 V 23 = 27 ~ I 26 ~ 19 - Stihl FS 88 | Instruction Manual - Page 21
. • Line up holes in clamp and handle support. • Insert the screws as far as stop. • Line up the bike handle. • Tighten the screws firmly. Fitting the control handle • Remove the screw (6) from the nut (7). • Take both parts out of the control handle (8). • Push the control handle onto the bike - Stihl FS 88 | Instruction Manual - Page 22
(1) with standoff lever 20 cm/8" (A) forward of the control handle (2). • Insert square nuts (3) in the standoff lever (4) line up the holes. ( 4 On FS 108 • Place the clamp (5) in the loop handle (1) and position them both against the drive tube (6). • Fit the clamp (7) and place standoff lever - Stihl FS 88 | Instruction Manual - Page 23
the Loop Handle Version A 4 At;) A 1 o o On FS 88 • Place the clamp (5) in the loop handle (1). • PlaE firmly. • Mount the loop handle (1) 20 cm/8" (A) forward of the control handle (2). On FS 108 • Place the clamp (3) in the loop handle (1) and position them both against the drive tube - Stihl FS 88 | Instruction Manual - Page 24
the loop handle (1) 20 cm/8" (A) forward of the control handle (2). • Place the clamp (3) in the loop handle (1). On FS 88 • Place packing sleeve (5) on the drive tube (4). "'- On FS 108 • Place both parts on the drive tube (4). • Fit the clamp (6) and make sure that the holes line up. • Insert the - Stihl FS 88 | Instruction Manual - Page 25
it up. • Insert M 5 x 18 screws and tighten down securely. Fitting skirt and blade • Slide the lower guide slot of the skirt (4) over the deflector (1) it must snap into position. • Push blade (5) into the upper gUide on the skirt and line it up with the first hole. • Fit the screw and tighten it - Stihl FS 88 | Instruction Manual - Page 26
Mounting the Cutting Tools [\ 1t f6\ \ 8 • Lay your brushcutter on its back with the gear head facing up. Blocking the output shaft • Insert stop pin (1) in the bore (2) at the side of the gear head as far as stop - apply slight pressure. • Rotate output shaft until the stop pin slips into - Stihl FS 88 | Instruction Manual - Page 27
from the head. Blade on deflector trims surplus line to correct length. • Fit new nylon line as described in instructions supplied with mowing head. STIHL Autocut 25-2 STIHL Autocut 30-2 • Lay your brushcutter on its back with the gear head facing up. • Screw mowing head counterclock- wise - Stihl FS 88 | Instruction Manual - Page 28
Line feed operates only if both lines still have a minimum length of 2.Scm/1". • Fit new nylon line as described in instructions supplied with mowing head. STIHL Autocut 24-2 STIHL Polymatic 30-2 • Lay your brushcutter on its back with the gear head facing up. • Slip the plain washer (1) and thrust - Stihl FS 88 | Instruction Manual - Page 29
- clockwise on to the output shaft and tighten it down firmly. Important! Remove the stop pin. Keep instruction sheet for mowing head in a safe place. 28 Releasing mounting nut STIHL Fixed Line Head • Block the output shaft and • Lay your brushcutter on its back unscrew the mounting - Stihl FS 88 | Instruction Manual - Page 30
Cutting edges of blade 230-8 (3) Releasing mounting nut • Block the output shaft. l must point clockwise. • Unscrew the mounting nut • Refer to instruction sheet supplied • Cutting blade 230-4 (4) and brush clockwise. with fixed line head. knife (5) may be fitted either way If the mounting - Stihl FS 88 | Instruction Manual - Page 31
@8 [ \6 ::==::..., 5 3 7 4 Circular saw blade 200 (chisel and scratcher tooth) Fit the appropriate stop before mounting circular saw blade. Fitting the stop see chapter "Mounting the Deflector". Mounting circular saw blade • Lay your brushcutter on its back with the gear head facing up. • Position - Stihl FS 88 | Instruction Manual - Page 32
but magnesium castings as well. This could cause running problems or even damage the engine. For this reason it is essential that you use only name branded fuels! Use only STIHL two-stroke engine oil or equivalent branded two-stroke air-cooled engine oils with the classification TC for mixing. We - Stihl FS 88 | Instruction Manual - Page 33
gas vapor and fumes, remove the fuel filler cap carefully so as to allow any pressure build-up in the tank to release slowly. Warning' After fueling, tighten fuel cap as securely as possible by hand. Change the fuel period, drain and clean the fuel tank and run engine until carburetor is dry. ...., - Stihl FS 88 | Instruction Manual - Page 34
Full harness • Put on the full harness (2). • Adjust length until the spring hook (3) rests against your right hip. Use of the carrying strap is described in chapters "Safety Precautions" and "Selecting the Cutting Tool". Balancing the brushcutter • Attach the spring hook (3) to the clamp (4) on - Stihl FS 88 | Instruction Manual - Page 35
manual. • Hold down the throttle trigger interlock (1) and squeeze the throttle trigger (2). • Move the slide control (3) to START position. • Now release the throttle trigger, slide control and trigger interlock in that order = This is the starting-throttle position. If engine the engine support - Stihl FS 88 | Instruction Manual - Page 36
not let the starter grip snap back - guide it slowly into the housing so that the starter rope can rewind properly. When engine begins to fire: If engine is cold: Set choke lever (4) to and continue cranking until engine runs. If engine is warm: Continue cranking until engine runs_ As soon as warm - Stihl FS 88 | Instruction Manual - Page 37
• Refit the spark plug and connect the spark plug terminal. • Set slide control to START. • Set choke lever to ... even if engine is cold. • Now start the engine. Fuel tank run until dry and then refueled • Continue cranking Engine will not start immediately because fuel pump has to be primed with - Stihl FS 88 | Instruction Manual - Page 38
FS 108 I ,I ~H~L ~IJJ-R~- LD The carburetor has been adjusted for optimum performance under the barometric pressure and climatic conditions at the factory. Basic setting This setting is the starting point for fine tuning and can be used as the standard setting. • Check air filter fuel efficient - Stihl FS 88 | Instruction Manual - Page 39
FS 108 ( I, Fine tuning • Mount the cutting tool. Machines with cutting head: • Trim line to correct length: Lines must extend as far as line limiting blade on the deflector • Carry out the basic setting. • Warm up engine ). • Run engine at full throttle • Warm up engine by running it Run engine at - Stihl FS 88 | Instruction Manual - Page 40
( II rH FS88 ( )@f;jL II R 117= I l-/@ L- --I---- FS 108 ( II Adjusting idle speed It is usually necessary to change the setting of the idle speed adjusting screw (LA or LD) after every correction to the low speed adjusting screw (L). Engine stops while idling Turn the idle speed adjusting - Stihl FS 88 | Instruction Manual - Page 41
idling speed so that the heat in the engine can be dissipated by flow of cooling air. This protects enginemounted components (ignition, carburetor) from thermal overload. After finishing work Storing for short period: To avoid condensation, fill the fuel tank and keep the unit in a dry place until - Stihl FS 88 | Instruction Manual - Page 42
setting, too much oil in fuel mix, dirty air filter, unfavorable running conditions, e.g. operating at part load. • Fit a new spark plug after approx. 100 operating hours - or earlier if the electrodes are badly eroded. • If there is a noticeable loss of engine power: • Set choke lever to - Stihl FS 88 | Instruction Manual - Page 43
in fresh, non-flammable cleaning solution (e.g. warm soapy water) and then dry. Replace damaged parts of filter. • Place the felt element in the filter base (5) first and then • the foam element. Fit the filter cover (1) - it must snap into position. • Check grease level after about •• every 50 - Stihl FS 88 | Instruction Manual - Page 44
Sharpening Cutting Tools t ~3 D3 ':) (") «"0' ([J r-- "'(") o ':) «"'0"' ([J r-- "'(") • Pull the shaft (3) out of the drive tube. • Use STIHL multipurpose grease 0781 120 1109 to coat dry areas of the shaft: Do not apply too much grease never pump grease into the drive tube. • - Stihl FS 88 | Instruction Manual - Page 45
cutters (2) uniformly - do not alter the contour of the parent blade (3) in any way. • After resharpening about 5 times, have blade checked on STIHL balancer 5910 850 2600 and rebalanced as necessary. Measurements and angles for resharpening Leave clearance of 2mm/5/64" (B) between cutting edge and - Stihl FS 88 | Instruction Manual - Page 46
)J 4_- 2 2 Sharpen correctly • If slightly dull: Use flat file (4) 0814 2123310In case of more serious wear or nicks: Resharpen with a grinder. • File back the cutting edge parallel to the lines (E) (see illustration). • Resharpen frequently, take away as little material as possible - two or - Stihl FS 88 | Instruction Manual - Page 47
)n 3 - ay ~) I ! I '--.-: -,-,I \ \ Sharpen correctly • If slightly dull: Use flat file (3) 0814 212 3310In case of more serious wear or nicks: Resharpen with a grinder maintain a sharpening angle of 300 (A) on the cutting edge (1). • File back the cutting edge parallel to the lines on the - Stihl FS 88 | Instruction Manual - Page 48
1/16"). Maintain the angle of 90° (E) and keep to existing direction of set. • Push the saw set downward until tbhuettss,loaRg"ia'n,ignsstidthee(Fs)awof the notch blade. • Check set of teeth again. Circular saw blade 200 (scratcher tooth) Never straighten or weld a bent or cracked circular - Stihl FS 88 | Instruction Manual - Page 49
. Removing rewind starter • Lay your brushculler on its back with the gear head facing up. • Remove the four screws (1) from the machine support (2) and lift it away. • Take out the screws (3). • Remove the starter cover (4) together with rewind starter mechanism. Replacing a broken starter rope - Stihl FS 88 | Instruction Manual - Page 50
simple overhand knot. • Thread other end - from inside - through the rope guide bush in the starter cover and the underside of the starter grip and secure - as described in "Replacing a broken starter rope". • Rei'tlove parts of old spring. • Fit the new spring - position outer spring loop in - Stihl FS 88 | Instruction Manual - Page 51
it. • Install the rope rotor. Tensioning the rewind spring The starter grip must be firmly seated in the rope guide bush. • Make a loop in the starter rope and use it to turn the rope rotor seven full revolutions rope off the rotor. • Refit and secure the starter cover and machine support. 50 - Stihl FS 88 | Instruction Manual - Page 52
: • Drain and clean the fuel tank. • Run engine until carburetor is dry - this helps prevent the carburetor diaphragms sticking together. • Remove, clean and inspect the ClLtting tool. • . Thoroughly clean the machine pay special attention to the cylinder fins and air filter. • Store the machine in - Stihl FS 88 | Instruction Manual - Page 53
conditions are difficult (very dusty work area, etc.), shorten the specified intervals accordingly. Complete machine Control handle Air filter r-- Filter in fuel tank Fuel tank Carburetor Spark plug Cylinder fins Spark arresting screen in muffler All accessible screws and nuts (not adjusting screws - Stihl FS 88 | Instruction Manual - Page 54
authorized STIHL Service Shop using original STIHL spare parts. Original STIHL parts can be identified by the STIHL part number, the logo STIHC and the STIHL parts symbol lSI",. The symbol may appear alone on small parts. Engine Single cylinder two-stroke engine Model FS 88 FS 108 Displacement - Stihl FS 88 | Instruction Manual - Page 55
Tool Sound pressure level Lpeq to ISO 7917 1) FS 88 2) FS 88 2) FS 88 R 3) dB (A) Mowina head 98 Metal tool 95 Mowina head 98 FS 88 R 4) Metal tool 95 FS 108 2) Mowina head 99 FS 108 2) Metal tool 96 FS 108 R 3) Mowina head 99 FS 108 R 4) Metal tool 96 Sound power Vibration level Lweq - Stihl FS 88 | Instruction Manual - Page 56
blade 200 (scratcher tooth) ** 41127134201 13 Circular saw blade 200 (chisel tooth) .. 41127134203 Not approved for FS 88 and FS 108 with loop handle without standoff lever Not approved for FS 88 and FS 108 with loop handle Nylon line for mowing heads " 2.4mm/0.095"(orange) - for 1 to 8 15m/50ft - Stihl FS 88 | Instruction Manual - Page 57
& WARNING! The engine exhaust from this product contains chemicals known to the State of California to cause cancer. birth defects or other reproductive harm. englisch/english U.S.A.
-
 1
1 -
 2
2 -
 3
3 -
 4
4 -
 5
5 -
 6
6 -
 7
7 -
8
-
9
-
10
-
11
-
12
-
13
-
14
-
15
-
16
-
17
-
18
-
19
-
20
-
21
-
22
-
23
-
24
-
25
-
26
-
27
-
28
-
29
-
30
-
31
-
32
-
33
-
34
-
35
-
36
-
37
-
38
-
39
-
40
-
41
-
42
-
43
-
44
-
45
-
46
-
47
-
48
-
49
-
50
-
51
-
52
-
53
-
54
-
55
-
56
-
57
 |
 |

STIHL
FS
BB,
7DB
Instruction
Manual
Owner's
Manual
Assembling
Safety Precautions
Operating
Instructions
Maintenance