Stihl FS 88 Instruction Manual - Page 30
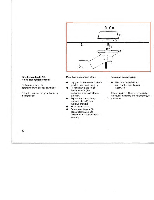
must point clockwise.
 |
View all Stihl FS 88 manuals
Add to My Manuals
Save this manual to your list of manuals |
Page 30 highlights
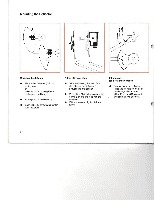
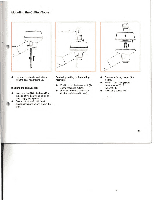
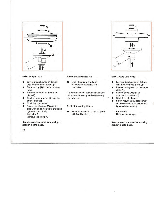
Releasing mounting nut Grass cutting blade 230 • Slip the thrust washer (6) Brush knife 250 and rider plate (7) over • Block the output shaft. the output shaft (8). • Unscrew the mounting nut Note: Remove skirt and blade from • Block the output shaft. clock wise. deflector before mounting these • Screw mounting nut (9) counter- cutting tools. clockwise on to output shaft and If the mounting nut becomes slack due tighten down securely. to frequent loosening and retightening, • Lay your brushcutter on its back Important! fit a new one. with the gear head facing up. Remove the stop pin. • Place cutting tool (1) on the thrust t Fitting nylon line plate (2). • Cutting edges of blade 230-8 (3) Releasing mounting nut • Block the output shaft. l must point clockwise. • Unscrew the mounting nut • Refer to instruction sheet supplied • Cutting blade 230-4 (4) and brush clockwise. with fixed line head. knife (5) may be fitted either way If the mounting nut becomes slack due round. to frequent loosening and retightening, fit a new one. 29
-
 1
1 -
2
-
3
-
4
-
5
-
6
-
7
-
8
-
9
-
10
-
11
-
12
-
13
-
14
-
15
-
16
-
17
-
18
-
19
-
20
-
21
-
22
-
23
-
24
-
 25
25 -
 26
26 -
 27
27 -
 28
28 -
 29
29 -
 30
30 -
 31
31 -
 32
32 -
 33
33 -
 34
34 -
 35
35 -
36
-
37
-
38
-
39
-
40
-
41
-
42
-
43
-
44
-
45
-
46
-
47
-
48
-
49
-
50
-
51
-
52
-
53
-
54
-
55
-
56
-
57
 |
 |
