Stihl TS 500i STIHL Cutquik Instruction Manual - Page 25
Assembling the cast arm and, guard
 |
View all Stihl TS 500i STIHL Cutquik manuals
Add to My Manuals
Save this manual to your list of manuals |
Page 25 highlights
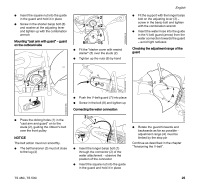
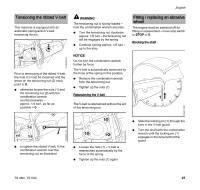
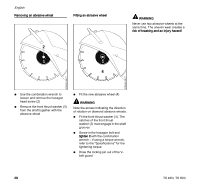
1 2 N remove the coupling sleeve (1); N unscrew the "water connection with screen" (2) and rinse under running water - the screen remains on the water connection. 1307BA002 KN 1307BA003 KN 370BA086 KN 370BA069 KN Assembling the cast arm and guard The "cast arm with guard" is mounted on the inboard side by the manufacturer. The "cast arm with guard" can also be mounted on the outboard side depending on requirements. Assembly on the inboard side is recommended for freehand cutting on account of the better balance. Outboard mounting N Disassemble the abrasive wheel (see "Fitting / replacing an abrasive wheel") Removing the water attachment 3 1 2 1 N Unscrew the banjo bolt (1) with the combination wrench - in the process, remove the square nut from the inside of the guard from the guide N Remove the water hose (2) with connector from the adjusting lever (3) N Pull the water hose (2) out of the guide (arrows) in the V-belt guard English Removing the adjusting lever 3 2 1 N Unscrew the banjo bolt (1) with the combination wrench and remove it together with the seal - in the process, remove the square nut from the inside of the guard from the guide N Unscrew the screw (2) N Turn the adjusting lever (3) upwards and remove Slackening the V-belt 2 1 0 1 1 N Unscrew the nuts (1) - do not remove them N Turn the tensioning nut (2) counterclockwise with the combination wrench - approx. 1/4 turn, as far as it will go = 0 TS 480i, TS 500i 23
-
 1
1 -
2
-
3
-
4
-
5
-
6
-
7
-
8
-
9
-
10
-
11
-
12
-
13
-
14
-
15
-
16
-
17
-
18
-
19
-
 20
20 -
 21
21 -
 22
22 -
 23
23 -
 24
24 -
 25
25 -
 26
26 -
 27
27 -
 28
28 -
 29
29 -
 30
30 -
31
-
32
-
33
-
34
-
35
-
36
-
37
-
38
-
39
-
40
-
41
-
42
-
43
-
44
-
45
-
46
-
47
-
48
-
49
-
50
-
51
-
52
-
53
-
54
-
55
-
56
-
57
-
58
-
59
-
60
-
61
-
62
-
63
-
64
-
65
-
66
-
67
-
68
-
69
-
70
-
71
-
72
-
73
-
74
-
75
-
76
-
77
-
78
-
79
-
80
-
81
-
82
-
83
-
84
-
85
-
86
-
87
-
88
-
89
-
90
-
91
-
92
-
93
-
94
-
95
-
96
-
97
-
98
-
99
-
100
-
101
-
102
-
103
-
104
 |
 |
