TASCAM CD-200BT Owners Manual - Page 10
Names and functions of parts - pairing
 |
View all TASCAM CD-200BT manuals
Add to My Manuals
Save this manual to your list of manuals |
Page 10 highlights
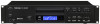
2 - Names and functions of parts Top panel 1 POWER switch Press this switch to turn the unit on or off. CAUTION • Before turning the power on, minimize the volume of connected equipment. Failure to do so could cause sudden loud noises, which might harm your hearing, for example. • Do not wear headphones when turning the power ON/OFF. Noise could damage speakers or your hearing. 2 Disc tray Insert discs (CD, CD-R, CD-RW) here. 3 OPEN/CLOSE button Use to open and close the disc tray. 4 PLAY/PAUSE button Press during playback to pause. When playback is stopped or paused, press to start playback. 5 STOP button Press this button to stop playback. Press this button when editing a program to clear all items added to the program. (See "Setting the program" on page 20.) 6 SEARCH m/,[.//] buttons Press briefly to select tracks (skip). Press and hold to search a track. 7 PHONES jack and knob Use this standard stereo jack to connect stereo headphones. Use a plug adapter when connecting headphones with mini-plugs. Use the PHONES knob to adjust the headphone output level. CAUTION Use the PHONES knob to minimize the volume before connecting headphones. Failure to do so could cause a sudden burst of loud noise, which might result in hearing damage, for example. 8 AUX IN jack Use this stereo mini jack for line level audio input. Connect a portable digital audio player or other external audio device to it. CAUTION Before connecting an external device to the AUX IN jack, minimize the volume of that device. Failure to do so could result in sudden loud noises that could, for example, harm your hearing. 9 DEVICE SEL/PAIRING button Press this button briefly to show the name of the device connected (or ready to be connected) by Bluetooth for two 10 TASCAM CD-200BT seconds. Press this button again briefly during this time to change the device to be connected by Bluetooth. (See "Searching for Bluetooth devices" on page 25.) Press and hold this button to start Bluetooth pairing mode. Press and hold this button when in pairing mode to end pairing mode. (See "Pairing" on page 25.) 0 Display Displays various information. q Remote Sensor When operating the remote control unit (RC-CD200BT), point it towards here. w DISPLAY [SHIFT] button You can change the time and other information shown on this display. When this button is pressed, the type of information currently displayed is shown for two seconds. Press the button again during this time to change the type of information shown. The information that can be shown depends on the current source, type of media and the status of operation. (See "Time and text information display" on page 23.) (See "Bluetooth information display" on page 26.) Press this button at the same time as another button to use its shift function, which is shown as black letters on a white background beneath the button.
-
 1
1 -
2
-
3
-
4
-
 5
5 -
 6
6 -
 7
7 -
 8
8 -
 9
9 -
 10
10 -
 11
11 -
 12
12 -
 13
13 -
 14
14 -
 15
15 -
16
-
17
-
18
-
19
-
20
-
21
-
22
-
23
-
24
-
25
-
26
-
27
-
28
-
29
-
30
-
31
-
32
 |
 |
