TASCAM DP-006 Owners Manual - Page 29
– Names and functions of parts, Top Panel
 |
View all TASCAM DP-006 manuals
Add to My Manuals
Save this manual to your list of manuals |
Page 29 highlights
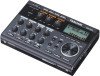
3 - Names and functions of parts Top Panel 1 button / indicator Press and hold this button to turn the unit ON and OFF. (See "Start-up & shutdown" on page 41.) The indicator lights when the power is on. 2 INPUT A/B LEVEL knobs and OL indicators Use the LEVEL knobs to adjust the input levels for INPUT A/B. (See "Making the first recording" on page 56.) If an input source level is too high its OL (overload) indicator lights. If a LEVEL knob is set too high (higher than 2-3 o'clock), the OL indicator could light even if the volume of the input source signal is suitable. 3 REPEAT button Turns the repeat playback mode ON and OFF. (See "Repeat playback" on page 65.) 4 IN/OUT button Press this button to open the I/O SETTINGscreen, and to set IN (starting) and OUT (ending) points for repeat playback and track editing. (See "Setting IN and OUT points" on page 65.) The IN and OUT points are also used as the starting and ending points when creating stereo master tracks. 5 REC MODE button Press this button to open the RECORDER MODEscreen where you can set the recorder mode. (See "Recorder modes" on page 42.) 6 UN/REDO button / indicator Press this button to undo the previous action or to redo the last undone action. (See "Undoing operations (undo)" on page 58.) Press this button while pressing and holding the Stop (8) button to open the HISTORYscreen. Using this screen, you can undo multiple operations at once. This indicator lights when one or more operations that have been undone can still be redone. 7 MASTER LEVEL knob This adjusts the stereo signal level output from the /LINE OUT jack This knob also adjusts the recording level when bouncing tracks, mixing down and mastering. 8 Display This shows various information. 9 INPUT SETTING button Press this button to open the INPUT SETTINGscreen where you can set input sources. (See "Selecting the input source" on page 51.) 29 TASCAM DP-006
-
 1
1 -
2
-
3
-
4
-
5
-
6
-
7
-
8
-
9
-
10
-
11
-
12
-
13
-
14
-
15
-
16
-
17
-
18
-
19
-
20
-
21
-
22
-
23
-
 24
24 -
 25
25 -
 26
26 -
 27
27 -
 28
28 -
 29
29 -
 30
30 -
 31
31 -
 32
32 -
 33
33 -
 34
34 -
35
-
36
-
37
-
38
-
39
-
40
-
41
-
42
-
43
-
44
-
45
-
46
-
47
-
48
-
49
-
50
-
51
-
52
-
53
-
54
-
55
-
56
-
57
-
58
-
59
-
60
-
61
-
62
-
63
-
64
-
65
-
66
-
67
-
68
-
69
-
70
-
71
-
72
-
73
-
74
-
75
-
76
-
77
-
78
-
79
-
80
-
81
-
82
-
83
-
84
-
85
-
86
-
87
-
88
-
89
-
90
-
91
-
92
-
93
-
94
-
95
-
96
-
97
-
98
-
99
-
100
-
101
-
102
-
103
-
104
 |
 |
