TP-Link AC1750 Archer C7 V3 User Guide US - Page 91
Access Control > Schedule
 |
View all TP-Link AC1750 manuals
Add to My Manuals
Save this manual to your list of manuals |
Page 91 highlights
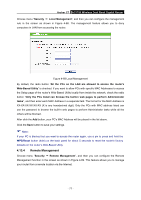
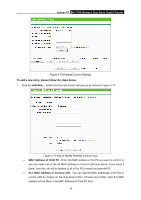
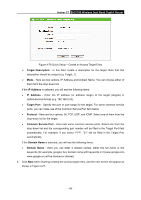
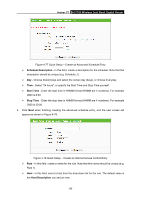
Archer C7 AC1750 Wireless Dual Band Gigabit Router Website Description - In this field, create a description for the website(s). Note that this description should be unique. Allowed Domain Name - In this field, you can enter 8 domain names allowed for the child to access, either the full name or the keywords (for example google). Any domain name with keywords in it (www.google.com, news.google.com) will be allowed. Effective Time - In this field, choose the effective time for the rule or you can make use of Access Control > Schedule to create the schedule as you like. The default value is Anytime. Status - In this field, there are two options, Enabled or Disabled. Enabled means that this rule will take effect while Disabled means that this rule won't take effect. 2. Enter the MAC address of the PC (e.g. 00-11-22-33-44-AA) you'd like to control in the MAC Address of Child PC field, or you can choose the MAC address from the All Address in Current LAN drop-down list. 3. Give a description (e.g. Allow Google) for the website allowed to be accessed in the Website Description field. 4. Enter the allowed domain name of the website, either the full name or the keywords (e.g. google) in the Allowed Domain Name field. Any domain name with keywords in it (www.google.com, www.google.com.hk) will be allowed. 5. Select from the Effective Time drop-down list the schedule (e.g. Schedule_1) you want. If there are not suitable schedules for you, click the Schedule in red below to go to the Advance Schedule Settings page and create the schedule you need. 6. In the Status field, you can select Enabled or Disabled to enable or disable your entry. 7. Click the Save button. Click the Enable All button to enable all the rules in the list. Click the Disable All button to disable all the rules in the list. Click the Delete All button to delete all the entries in the table. Click the Next button to go to the next page, or click the Previous button to return to the previous page. For example: If you desire that the child PC with MAC address 00-11-22-33-44-AA can access www.google.com on Saturday only while the parent PC with MAC address 00-11-22-33-44-BB is without any restriction, you should follow the settings below. 1. Click "Parental Control" menu on the left to enter the Parental Control Settings page. Check Enable and enter the MAC address 00-11-22-33-44-BB in the MAC Address of Parental PC field. - 80 -
-
 1
1 -
2
-
3
-
4
-
5
-
6
-
7
-
8
-
9
-
10
-
11
-
12
-
13
-
14
-
15
-
16
-
17
-
18
-
19
-
20
-
21
-
22
-
23
-
24
-
25
-
26
-
27
-
28
-
29
-
30
-
31
-
32
-
33
-
34
-
35
-
36
-
37
-
38
-
39
-
40
-
41
-
42
-
43
-
44
-
45
-
46
-
47
-
48
-
49
-
50
-
51
-
52
-
53
-
54
-
55
-
56
-
57
-
58
-
59
-
60
-
61
-
62
-
63
-
64
-
65
-
66
-
67
-
68
-
69
-
70
-
71
-
72
-
73
-
74
-
75
-
76
-
77
-
78
-
79
-
80
-
81
-
82
-
83
-
84
-
85
-
 86
86 -
 87
87 -
 88
88 -
 89
89 -
 90
90 -
 91
91 -
 92
92 -
 93
93 -
 94
94 -
 95
95 -
 96
96 -
97
-
98
-
99
-
100
-
101
-
102
-
103
-
104
-
105
-
106
-
107
-
108
-
109
-
110
-
111
-
112
-
113
-
114
-
115
-
116
-
117
-
118
-
119
-
120
-
121
-
122
-
123
-
124
-
125
-
126
-
127
-
128
-
129
-
130
-
131
-
132
-
133
-
134
-
135
-
136
-
137
-
138
-
139
-
140
-
141
 |
 |