TP-Link TL-WR941ND User Guide - Page 83
No-ip.com DDNS
 |
UPC - 696726941019
View all TP-Link TL-WR941ND manuals
Add to My Manuals
Save this manual to your list of manuals |
Page 83 highlights
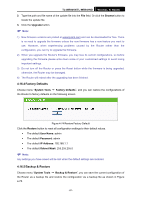
TL-WR941N/TL-WR941ND Wireless N Router Figure 4-67 Dyndns.org DDNS Settings To set up for DDNS, follow these instructions: 1. Type the User Name for your DDNS account. 2. Type the Password for your DDNS account. 3. Type the Domain Name you received from dynamic DNS service provider here. 4. Click the Login button to log in to the DDNS service. Connection Status -The status of the DDNS service connection is displayed here. Click Logout to logout of the DDNS service. 4.15.3 No-ip.com DDNS If the dynamic DNS Service Provider you select is www.no-ip.com, the page will appear as shown in Figure 4-68.. -76-
-
 1
1 -
2
-
3
-
4
-
5
-
6
-
7
-
8
-
9
-
10
-
11
-
12
-
13
-
14
-
15
-
16
-
17
-
18
-
19
-
20
-
21
-
22
-
23
-
24
-
25
-
26
-
27
-
28
-
29
-
30
-
31
-
32
-
33
-
34
-
35
-
36
-
37
-
38
-
39
-
40
-
41
-
42
-
43
-
44
-
45
-
46
-
47
-
48
-
49
-
50
-
51
-
52
-
53
-
54
-
55
-
56
-
57
-
58
-
59
-
60
-
61
-
62
-
63
-
64
-
65
-
66
-
67
-
68
-
69
-
70
-
71
-
72
-
73
-
74
-
75
-
76
-
77
-
 78
78 -
 79
79 -
 80
80 -
 81
81 -
 82
82 -
 83
83 -
 84
84 -
 85
85 -
 86
86 -
 87
87 -
 88
88 -
89
-
90
-
91
-
92
-
93
-
94
-
95
-
96
-
97
-
98
-
99
-
100
-
101
-
102
-
103
-
104
-
105
-
106
 |
 |

TL-WR941N/TL-WR941ND
Wireless N Router
-76-
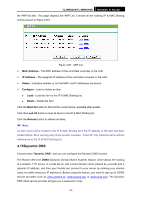
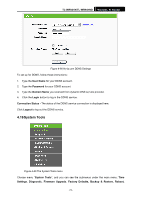
Figure 4-67
Dyndns.org DDNS Settings
To set up for DDNS, follow these instructions:
1.
Type the
User Name
for your DDNS account.
2.
Type the
Password
for your DDNS account.
3.
Type the
Domain Name
you received from dynamic DNS service provider here.
4.
Click the
Login
button to log in to the DDNS service.
Connection Status -
The status of the DDNS service connection is displayed here.
Click
Logout
to logout of the DDNS service.
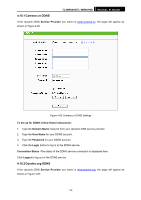
4.15.3 No-ip.com DDNS
If the dynamic DNS
Service Provider
you select is
www.no-ip.com
, the page will appear as
shown in Figure 4-68..