TRENDnet TEW-673GRU User's Guide - Page 47
Dynamic, Routing Table, Network Mask, Gateway Address, Interface, Metric, Update, Delete, Transmit
 |
UPC - 710931600445
View all TRENDnet TEW-673GRU manuals
Add to My Manuals
Save this manual to your list of manuals |
Page 47 highlights
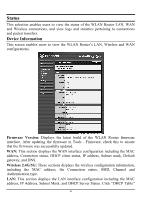
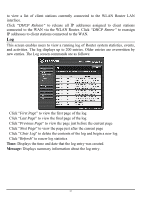
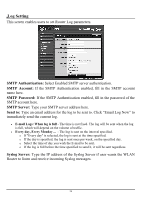
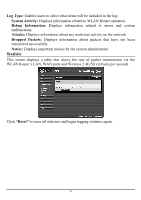
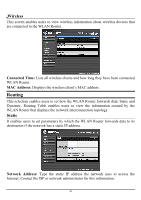
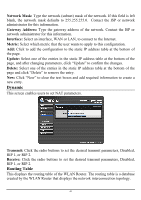
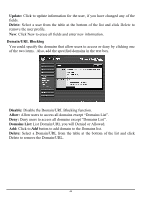
Network Mask: Type the network (subnet) mask of the network. If this field is left blank, the network mask defaults to 255.255.255.0. Contact the ISP or network administrator for this information. Gateway Address: Type the gateway address of the network. Contact the ISP or network administrator for this information. Interface: Select an interface, WAN or LAN, to connect to the Internet. Metric: Select which metric that the user wants to apply to this configuration. Add: Click to add the configuration to the static IP address table at the bottom of the page. Update: Select one of the entries in the static IP address table at the bottom of the page, and after changing parameters, click "Update" to confirm the changes. Delete: Select one of the entries in the static IP address table at the bottom of the page and click "Delete" to remove the entry. New: Click "New" to clear the text boxes and add required information to create a new entry. Dynamic This screen enables users to set NAT parameters. Transmit: Click the radio buttons to set the desired transmit parameters, Disabled, RIP 1, or RIP 2. Receive: Click the radio buttons to set the desired transmit parameters, Disabled, RIP 1, or RIP 2. Routing Table This displays the routing table of the WLAN Router. The routing table is a database created by the WLAN Router that displays the network interconnection topology. 41
-
 1
1 -
2
-
3
-
4
-
5
-
6
-
7
-
8
-
9
-
10
-
11
-
12
-
13
-
14
-
15
-
16
-
17
-
18
-
19
-
20
-
21
-
22
-
23
-
24
-
25
-
26
-
27
-
28
-
29
-
30
-
31
-
32
-
33
-
34
-
35
-
36
-
37
-
38
-
39
-
40
-
41
-
 42
42 -
 43
43 -
 44
44 -
 45
45 -
 46
46 -
 47
47 -
 48
48 -
 49
49 -
 50
50 -
 51
51 -
 52
52 -
53
-
54
-
55
-
56
-
57
-
58
-
59
-
60
-
61
-
62
-
63
-
64
-
65
-
66
-
67
-
68
-
69
-
70
-
71
-
72
-
73
-
74
-
75
-
76
-
77
-
78
-
79
-
80
 |
 |
