TRENDnet TEW-824DRU User's Guide - Page 36
Clone a MAC address, Change your router IP address, Advanced, Setup, WAN Settings, Enable, C Address
 |
View all TRENDnet TEW-824DRU manuals
Add to My Manuals
Save this manual to your list of manuals |
Page 36 highlights
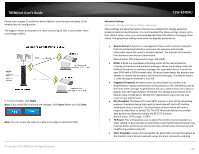
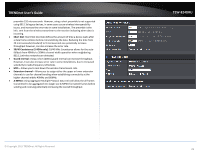
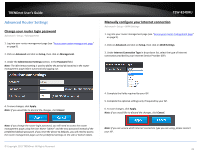
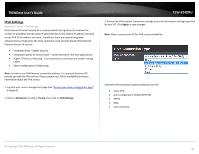
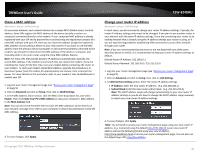
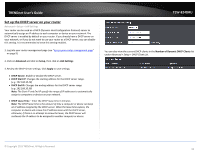
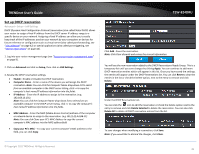
TRENDnet User's Guide Clone a MAC address Advanced > Setup > WAN Settings On any home network, each network device has a unique MAC (Media Access Control) address. Some ISPs register the MAC address of the device (usually a router or a computer) connected directly to the modem. If your computer MAC address is already registered with your ISP and to prevent the re-provisioning and registration process of a new MAC address with your ISP, then you can clone the address (assign the registered MAC address of your previous device to your new router). If you want to use the MAC address from the previous device (computer or old router that directly connected to the modem, you should first determine the MAC address of the device or computer and manually enter it into your router using the clone MAC address feature. Note: For many ISPs that provide dynamic IP addresses automatically, typically, the stored MAC address in the modem is reset each time you restart the modem. If you are installing this router for the first time, turn your modem before connecting the router to your modem. To clear your modem stored MAC address, typically the procedure is to disconnect power from the modem for approximately one minute, then reconnect the power. For more details on this procedure, refer to your modem's User Guide/Manual or contact your ISP. 1. Log into your router management page (see "Access your router management page" on page 9). 2. Click on Advanced and click on Setup, then click on WAN Settings. 3. In the MAC Address Clone section, click the MAC Clone drop-down list, and select Enable. Then click Clone Your PC's MAC Address to copy your computer's MAC address in the MAC Address field. Note: You can also check the DHCP Client List for the MAC addresses of the devices on your network, see page 34 or refer to your computer or device documentation to find the MAC address. 4. To save changes, click Apply. © Copyright 2015 TRENDnet. All Rights Reserved. TEW-824DRU Change your router IP address Advanced > Setup > LAN Settings In most cases, you do not need to change your router IP address settings. Typically, the router IP address settings only needs to be changed, if you plan to use another router in your network with the same IP address settings, if you are connecting your router to an existing network that is already using the IP address settings your router is using, or if you are experiencing problems establishing VPN connections to your office network through your router. Note: If you are not encountering any issues or are not faced with one of the cases described above or similar, it is recommended to keep your router IP address settings as default. Default Router IP Address: 192.168.10.1 Default Router Network: 192.168.10.0 / 255.255.255.0 1. Log into your router management page (see "Access your router management page" on page 9). 2. Click on Advanced and click on Setup, then click on LAN Settings. 3. In LAN Interface Setting section, Enter the router IP address settings. IP Address: Enter the new router IP address. (e.g. 192.168.200.1) Subnet Mask: Enter the new router subnet mask. (e.g. 255.255.255.0) Note: The DHCP address range will change automatically to your new router IP address settings so you do not have to change the DHCP address range manually to match your new router IP address settings. 4. To save changes, click Apply. Note: You will need to access your router management page using your new router IP address. (e.g. Instead of using the default http://192.168.10.1 your new router IP address will use the following format using your new IP address http://(new.ipaddress.here) to access your router management page. You can also use the default login URL http://tew-824dru 33
-
 1
1 -
2
-
3
-
4
-
5
-
6
-
7
-
8
-
9
-
10
-
11
-
12
-
13
-
14
-
15
-
16
-
17
-
18
-
19
-
20
-
21
-
22
-
23
-
24
-
25
-
26
-
27
-
28
-
29
-
30
-
 31
31 -
 32
32 -
 33
33 -
 34
34 -
 35
35 -
 36
36 -
 37
37 -
 38
38 -
 39
39 -
 40
40 -
 41
41 -
42
-
43
-
44
-
45
-
46
-
47
-
48
-
49
-
50
-
51
-
52
-
53
-
54
-
55
-
56
-
57
-
58
-
59
-
60
-
61
-
62
-
63
-
64
-
65
-
66
-
67
-
68
-
69
-
70
-
71
 |
 |
