TRENDnet TPL210AP User's Guide - Page 31
Step 3: Set Wireless Encryption, Step 4: Setup Completed
 |
UPC - 710931506068
View all TRENDnet TPL210AP manuals
Add to My Manuals
Save this manual to your list of manuals |
Page 31 highlights
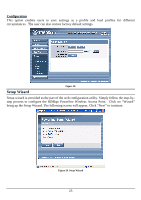
Step 3: Set Wireless Encryption If user wants to enable WEP, please click "Enabled". Then, select the key size of WEP encryption and enter the Key value in the Key text box. Please click "Next" to continue. Figure 32. Setup Wizard - Set Wireless Encryption Step 4: Setup Completed The Setup wizard is now completed. The new settings will be effective after the 85Mbps Powerline Wireless Access Point restarted. Please click "RESTART" to reboot the 85Mbps Powerline Wireless Access Point. If the user does not want to make any changes, please click "EXIT" to quit without any changes. The user can also go back to modify the setting by clicking "BACK". Figure 33. Setup Wizard - Setup Completed 25
-
 1
1 -
2
-
3
-
4
-
5
-
6
-
7
-
8
-
9
-
10
-
11
-
12
-
13
-
14
-
15
-
16
-
17
-
18
-
19
-
20
-
21
-
22
-
23
-
24
-
25
-
 26
26 -
 27
27 -
 28
28 -
 29
29 -
 30
30 -
 31
31 -
 32
32 -
 33
33 -
 34
34 -
 35
35 -
 36
36
 |
 |

25
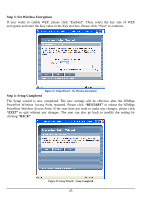
Step 3: Set Wireless Encryption
If user wants to enable WEP, please click “Enabled”. Then, select the key size of WEP
encryption and enter the Key value in the Key text box. Please click “Next” to continue.
Figure 32. Setup Wizard – Set Wireless Encryption
Step 4: Setup Completed
The Setup wizard is now completed. The new settings will be effective after the 85Mbps
Powerline Wireless Access Point restarted. Please click
“RESTART”
to reboot the 85Mbps
Powerline Wireless Access Point. If the user does not want to make any changes, please click
“EXIT”
to quit without any changes. The user can also go back to modify the setting by
clicking
“BACK”
.
Figure 33. Setup Wizard – Setup Completed